
Welcome to my Blog
Recent Posts
Handling form actions in React
Handling form actions in React
Todo
Setup supabase for nextjs
Supabase
This guide was last updated on March 1st, 2025. So if any changes please email or add comments below. Thanks ! p
Using brew, install supabase cli
$ brew install supabase/tap/supabase

Initialize your supabase project, move to your current project's root directory and :
$ supabase init
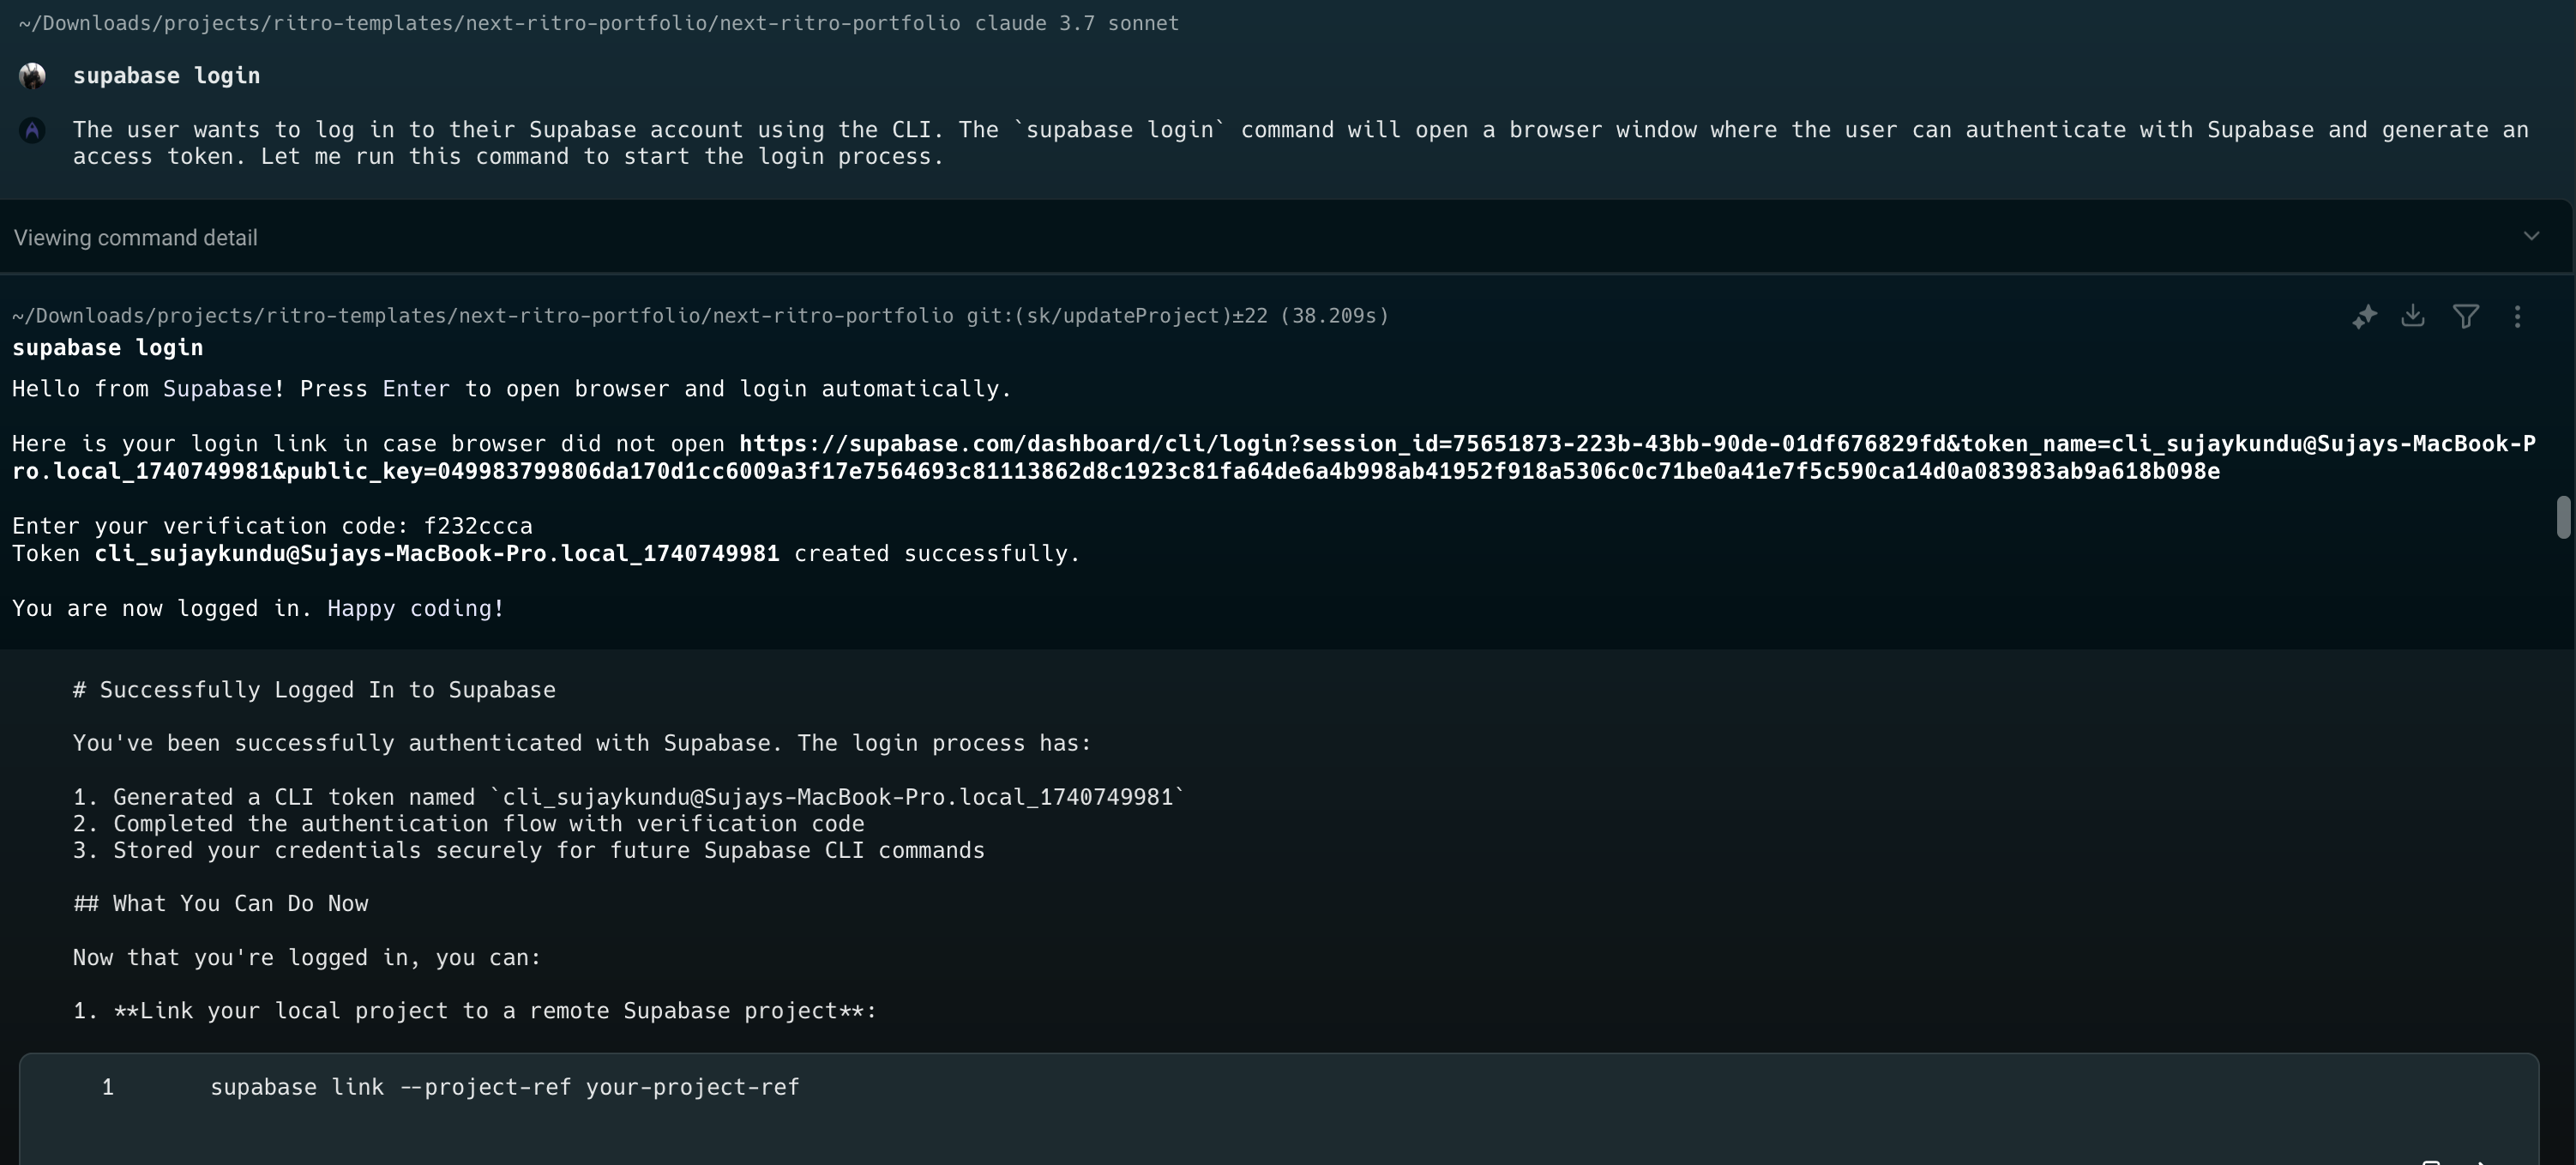
Once initialized, login to supabase :
$ supabase login
This will create a new login link which you can use for authenticating with Supabase in your browser.
Once installed, login to supabase using cli:
After logging in, We can link our remote supabase project/create new supabase project :
For new supabase project
If you don't have a remote supabase project (the project created at supabase.com), you can also create a new project straight from the cli, (You can get your organization ID from the Supabase dashboard) :
$ supabase projects create "Your Project Name" --org-id your-org-id
List your existing Supabase projects:
$ supabase projects list
Access your Supabase dashboard in the browser:
$ supabase dashboard
For local supabase project
Start your local Supabase instance:
$ supabase start
Link your local project to a remote Supabase project (if you have one):
$ supabase link --project-ref your-project-ref
This will pull all your remote configuration and create a config.toml file with the configuration settings:
It uses config as code, by which the cli will bootstrap the entire supabase stack on your local machine. It uses exactly the same infra as the hosted solution, you can read more about it
Config as code
For detailed configuration reference documentation, visit:
Supabase CLI config
Synchronize remote configurations to local :
To synchronize your configuration with the remote project, consider updating your local supabase/config.toml file. You have two options:
- Manually update
You can update the config.toml file locally and push your changes to remote
- Pull the remote configuration:
To pull the remote configuration, you need to have Docker daemon running, if you have installed docker, you can start docker and run the below command, If you haven't you have to setup Docker Desktop locally and start it, then run the below command, that should do it.
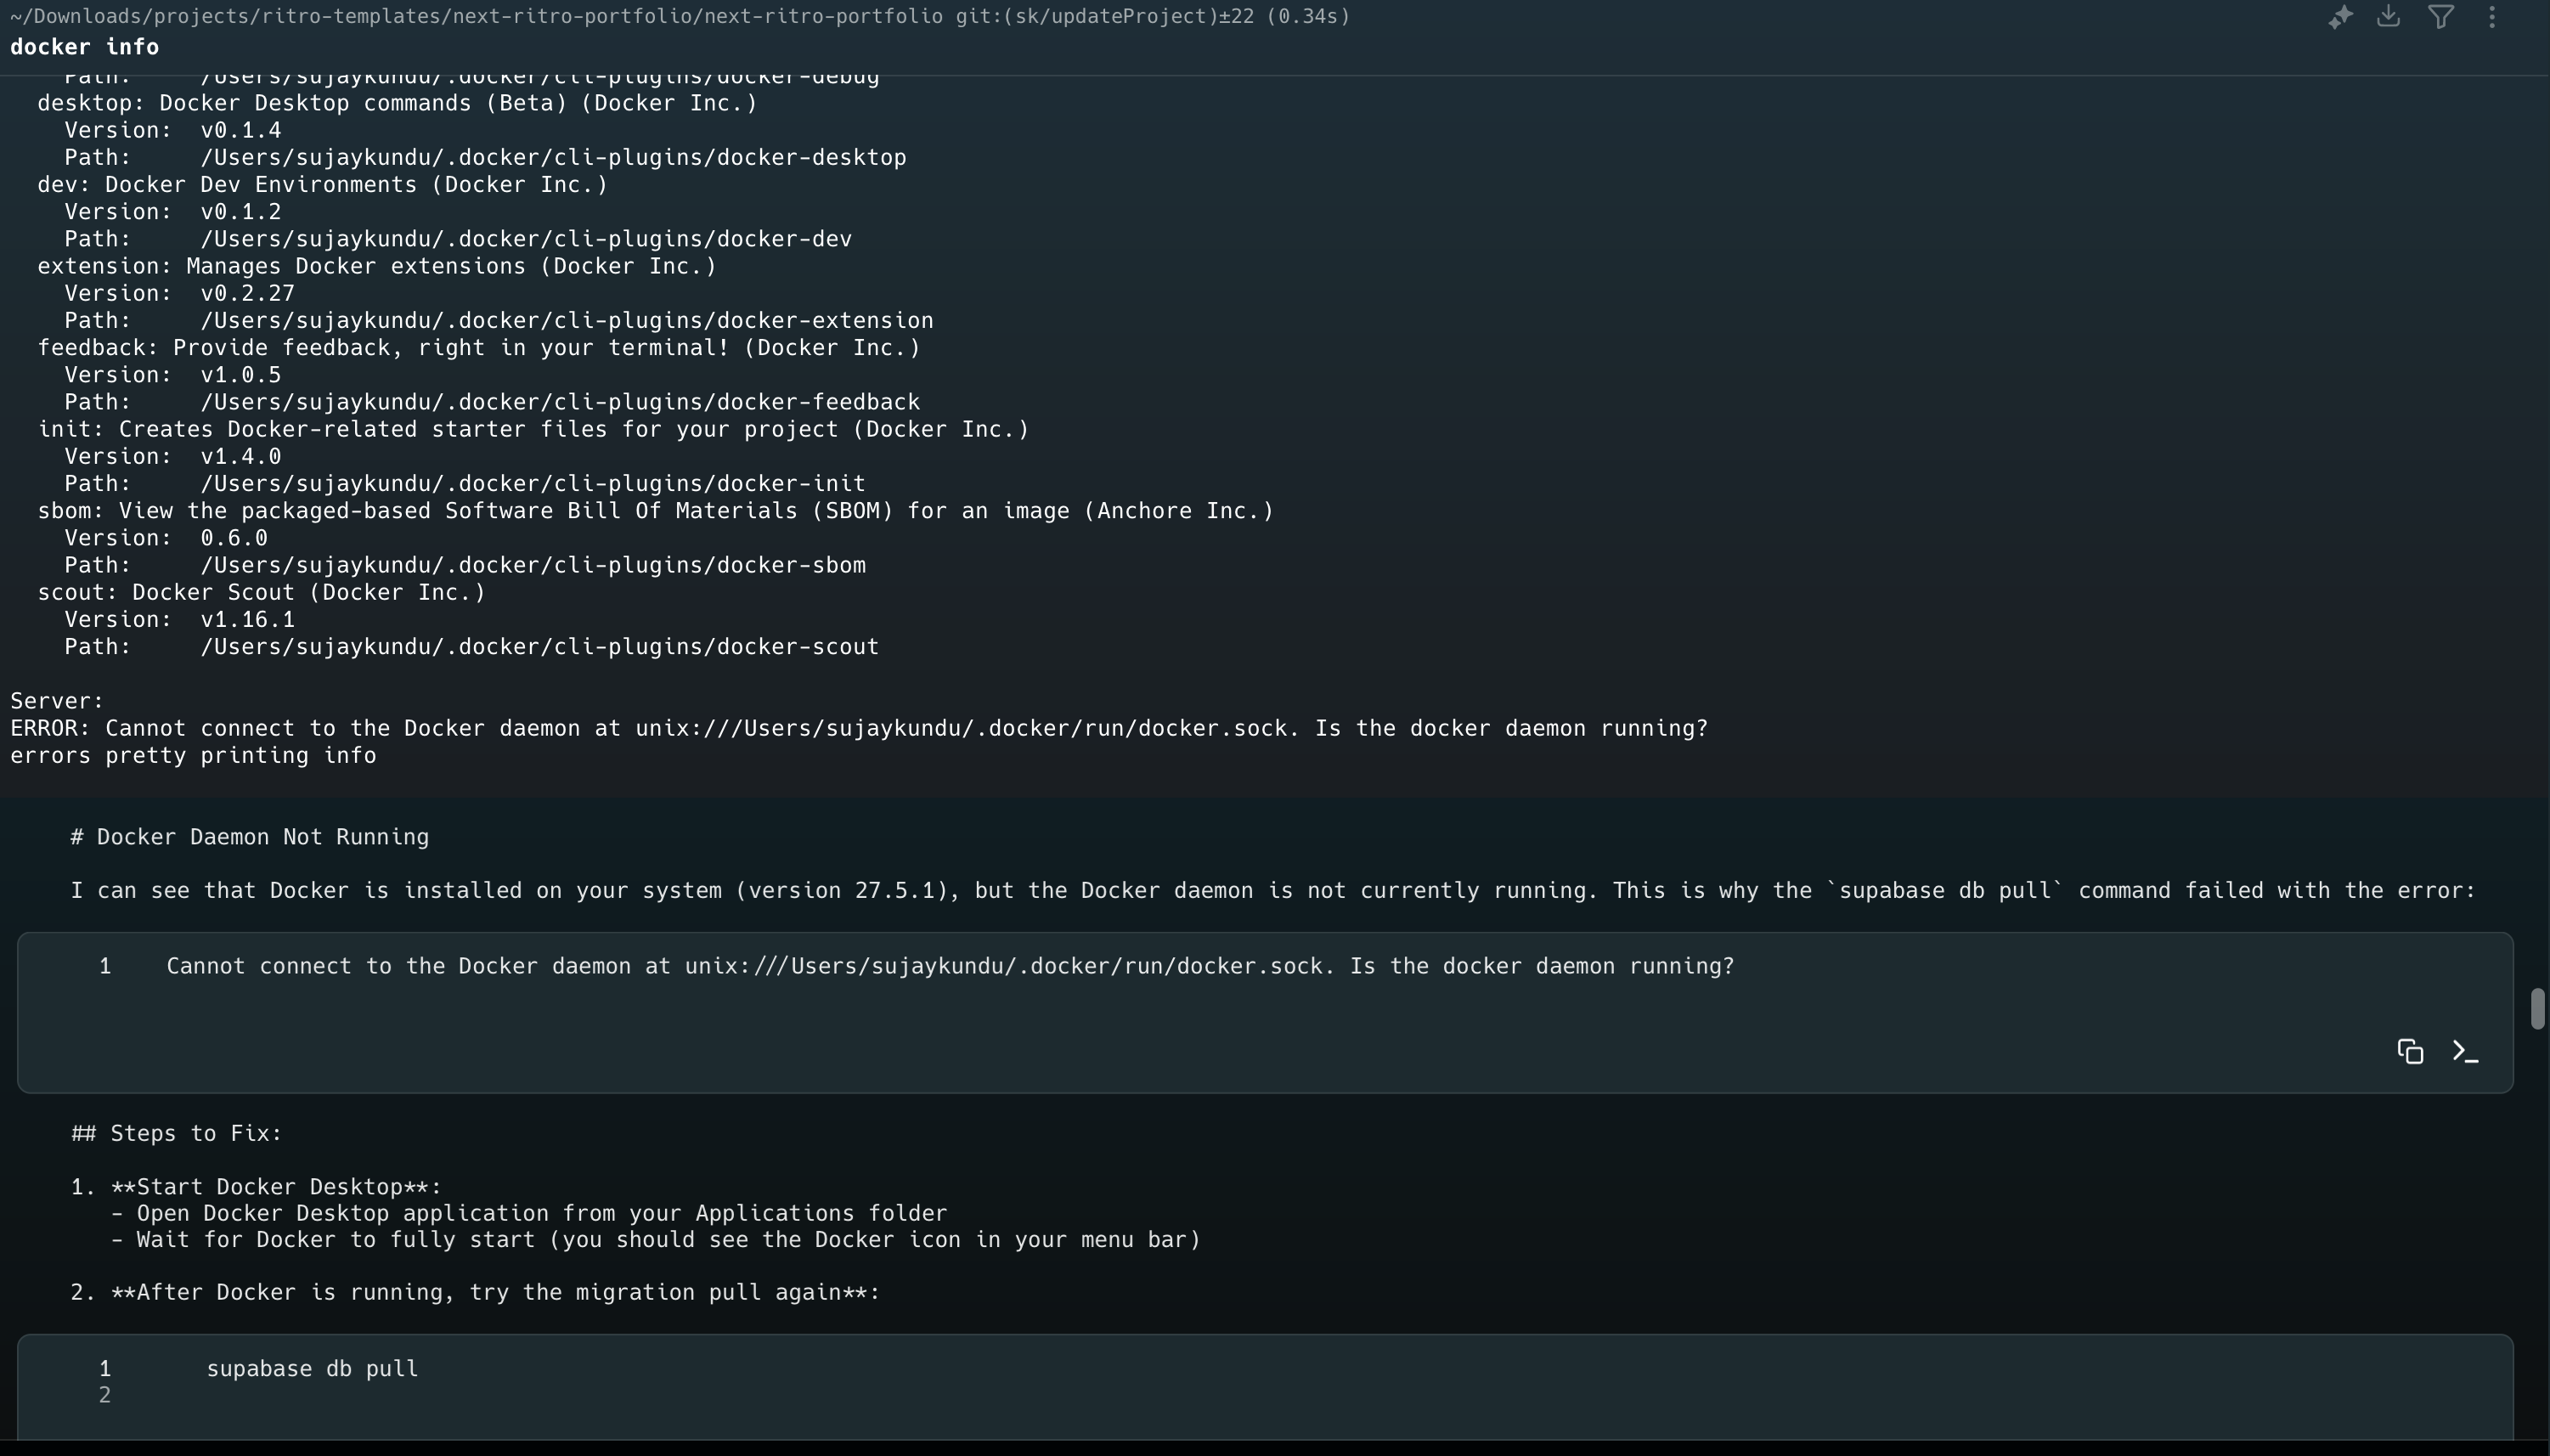
Even, if the docker is installed, docker is not running, we need to check that. You can check the docker version :
$ docker --version
If you try to run pull command it will throw error
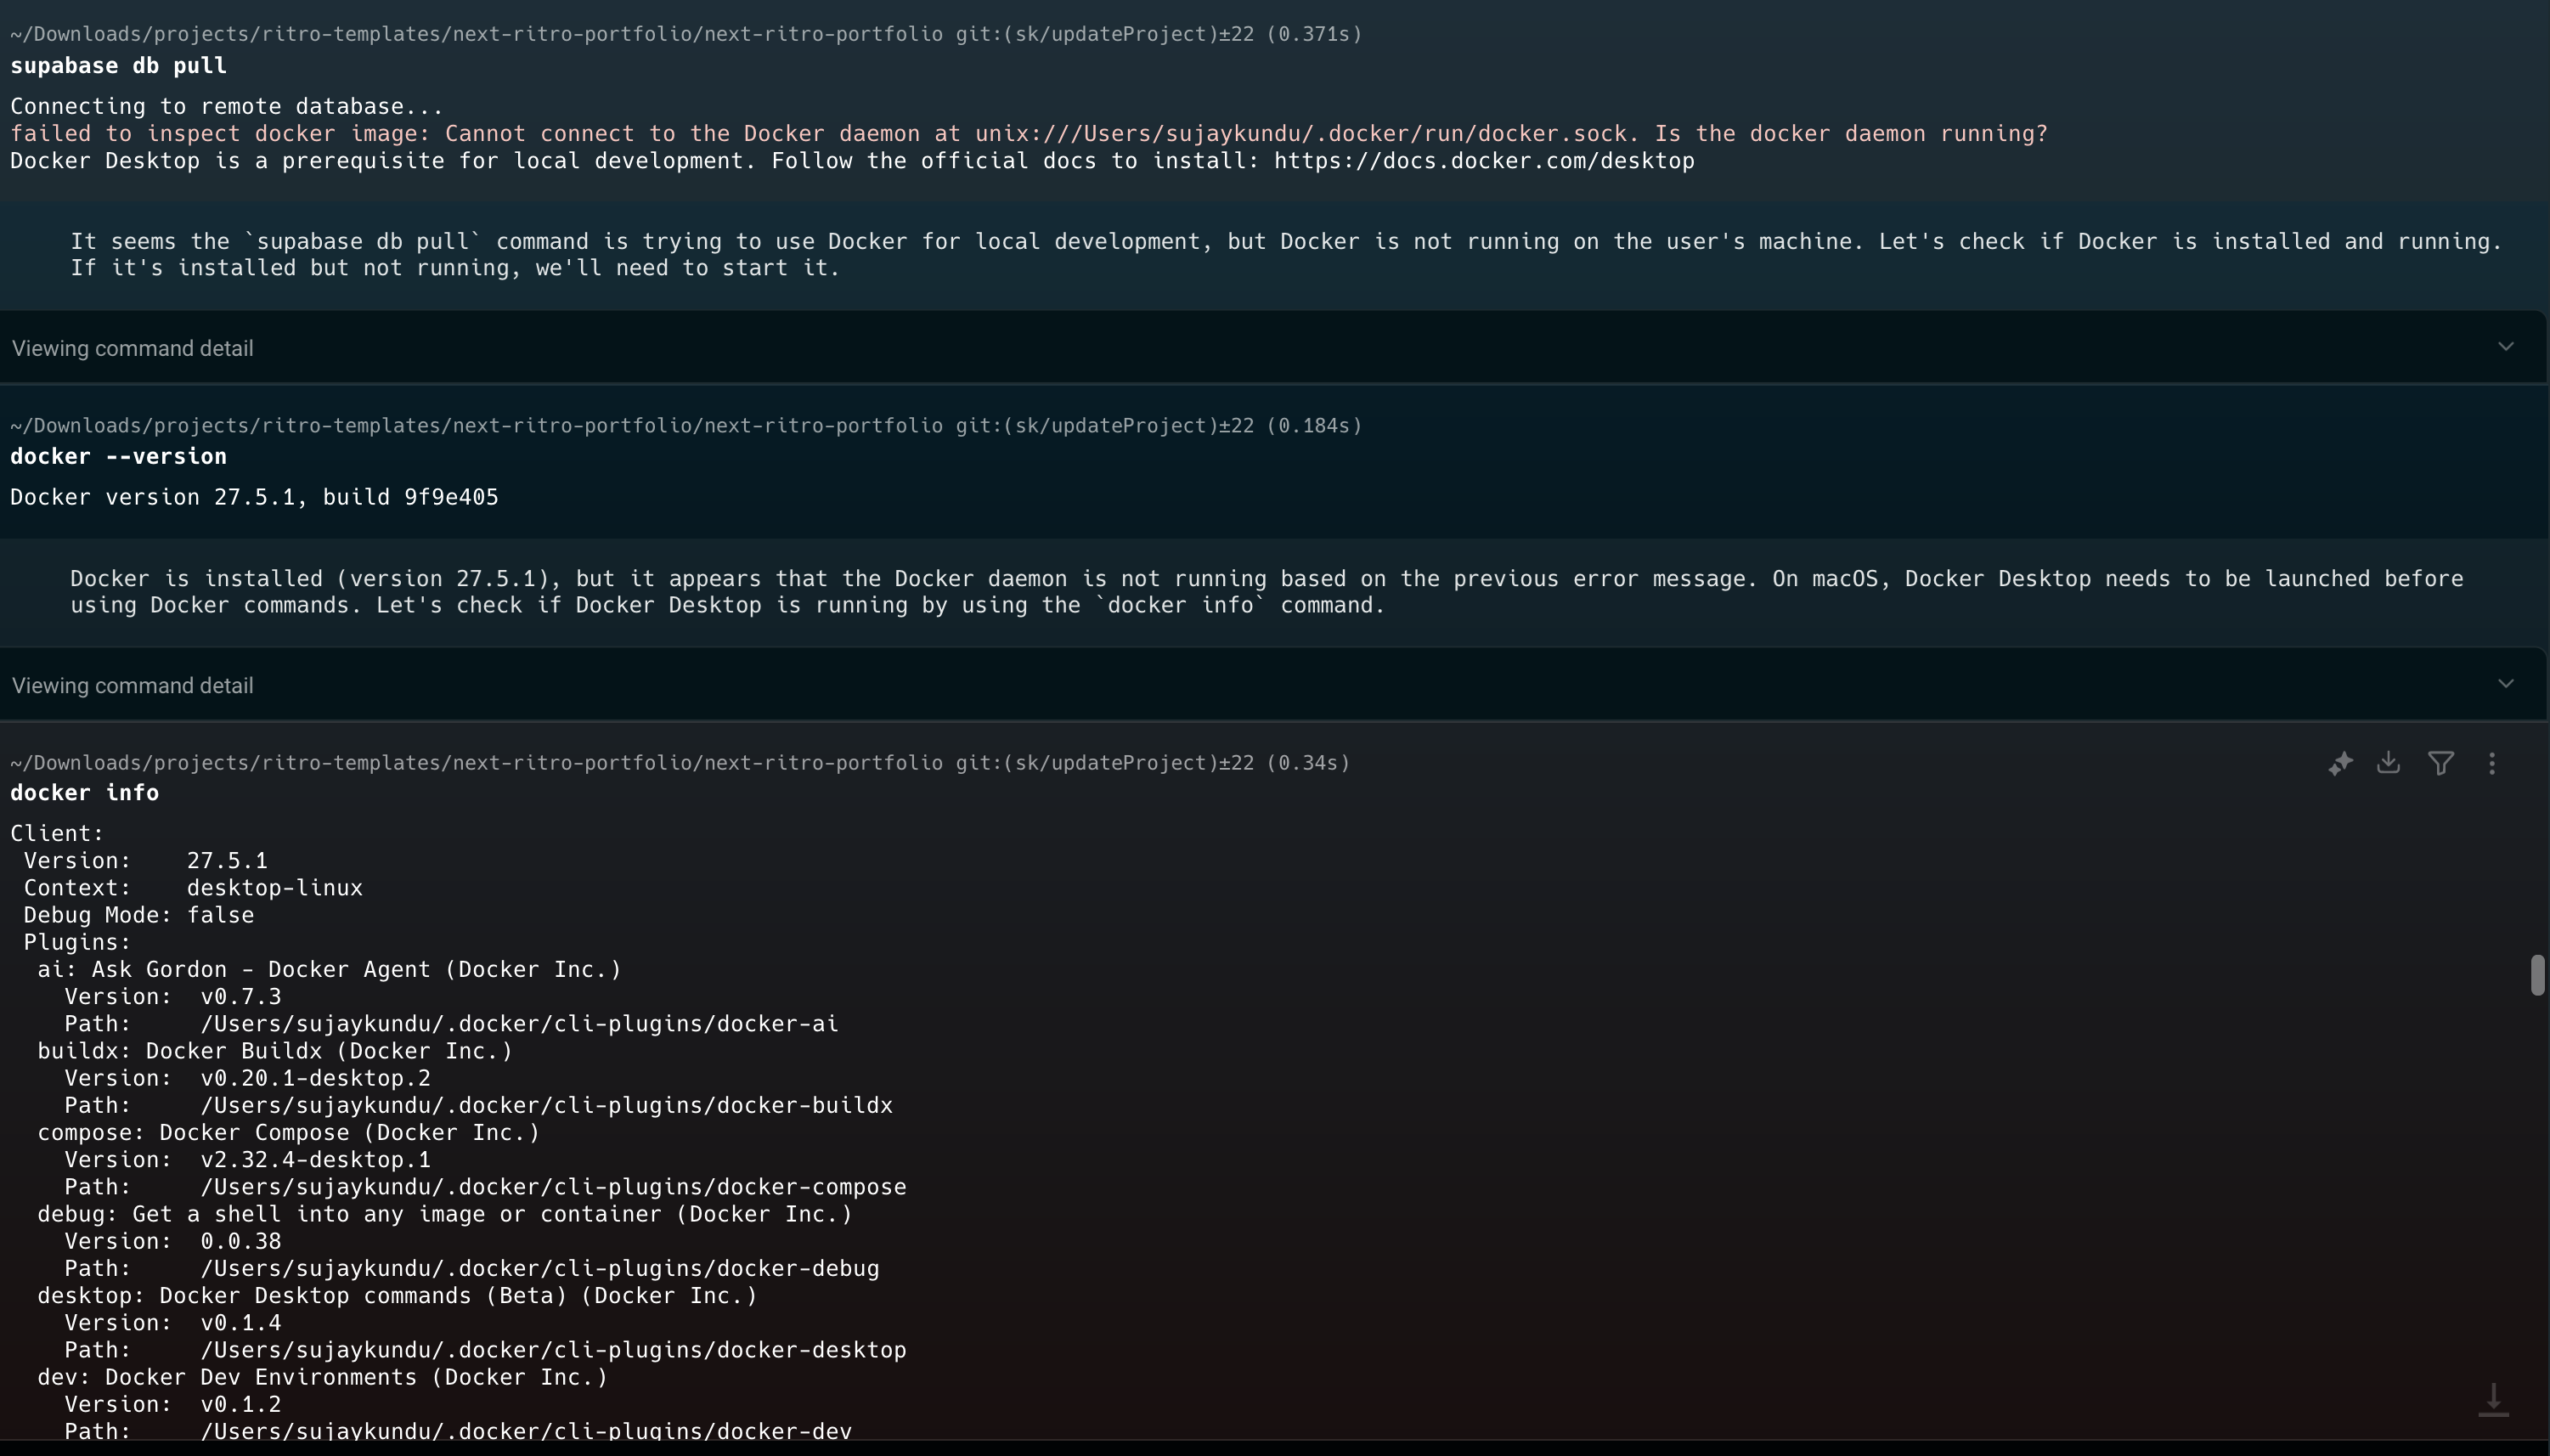
Once docker is running :
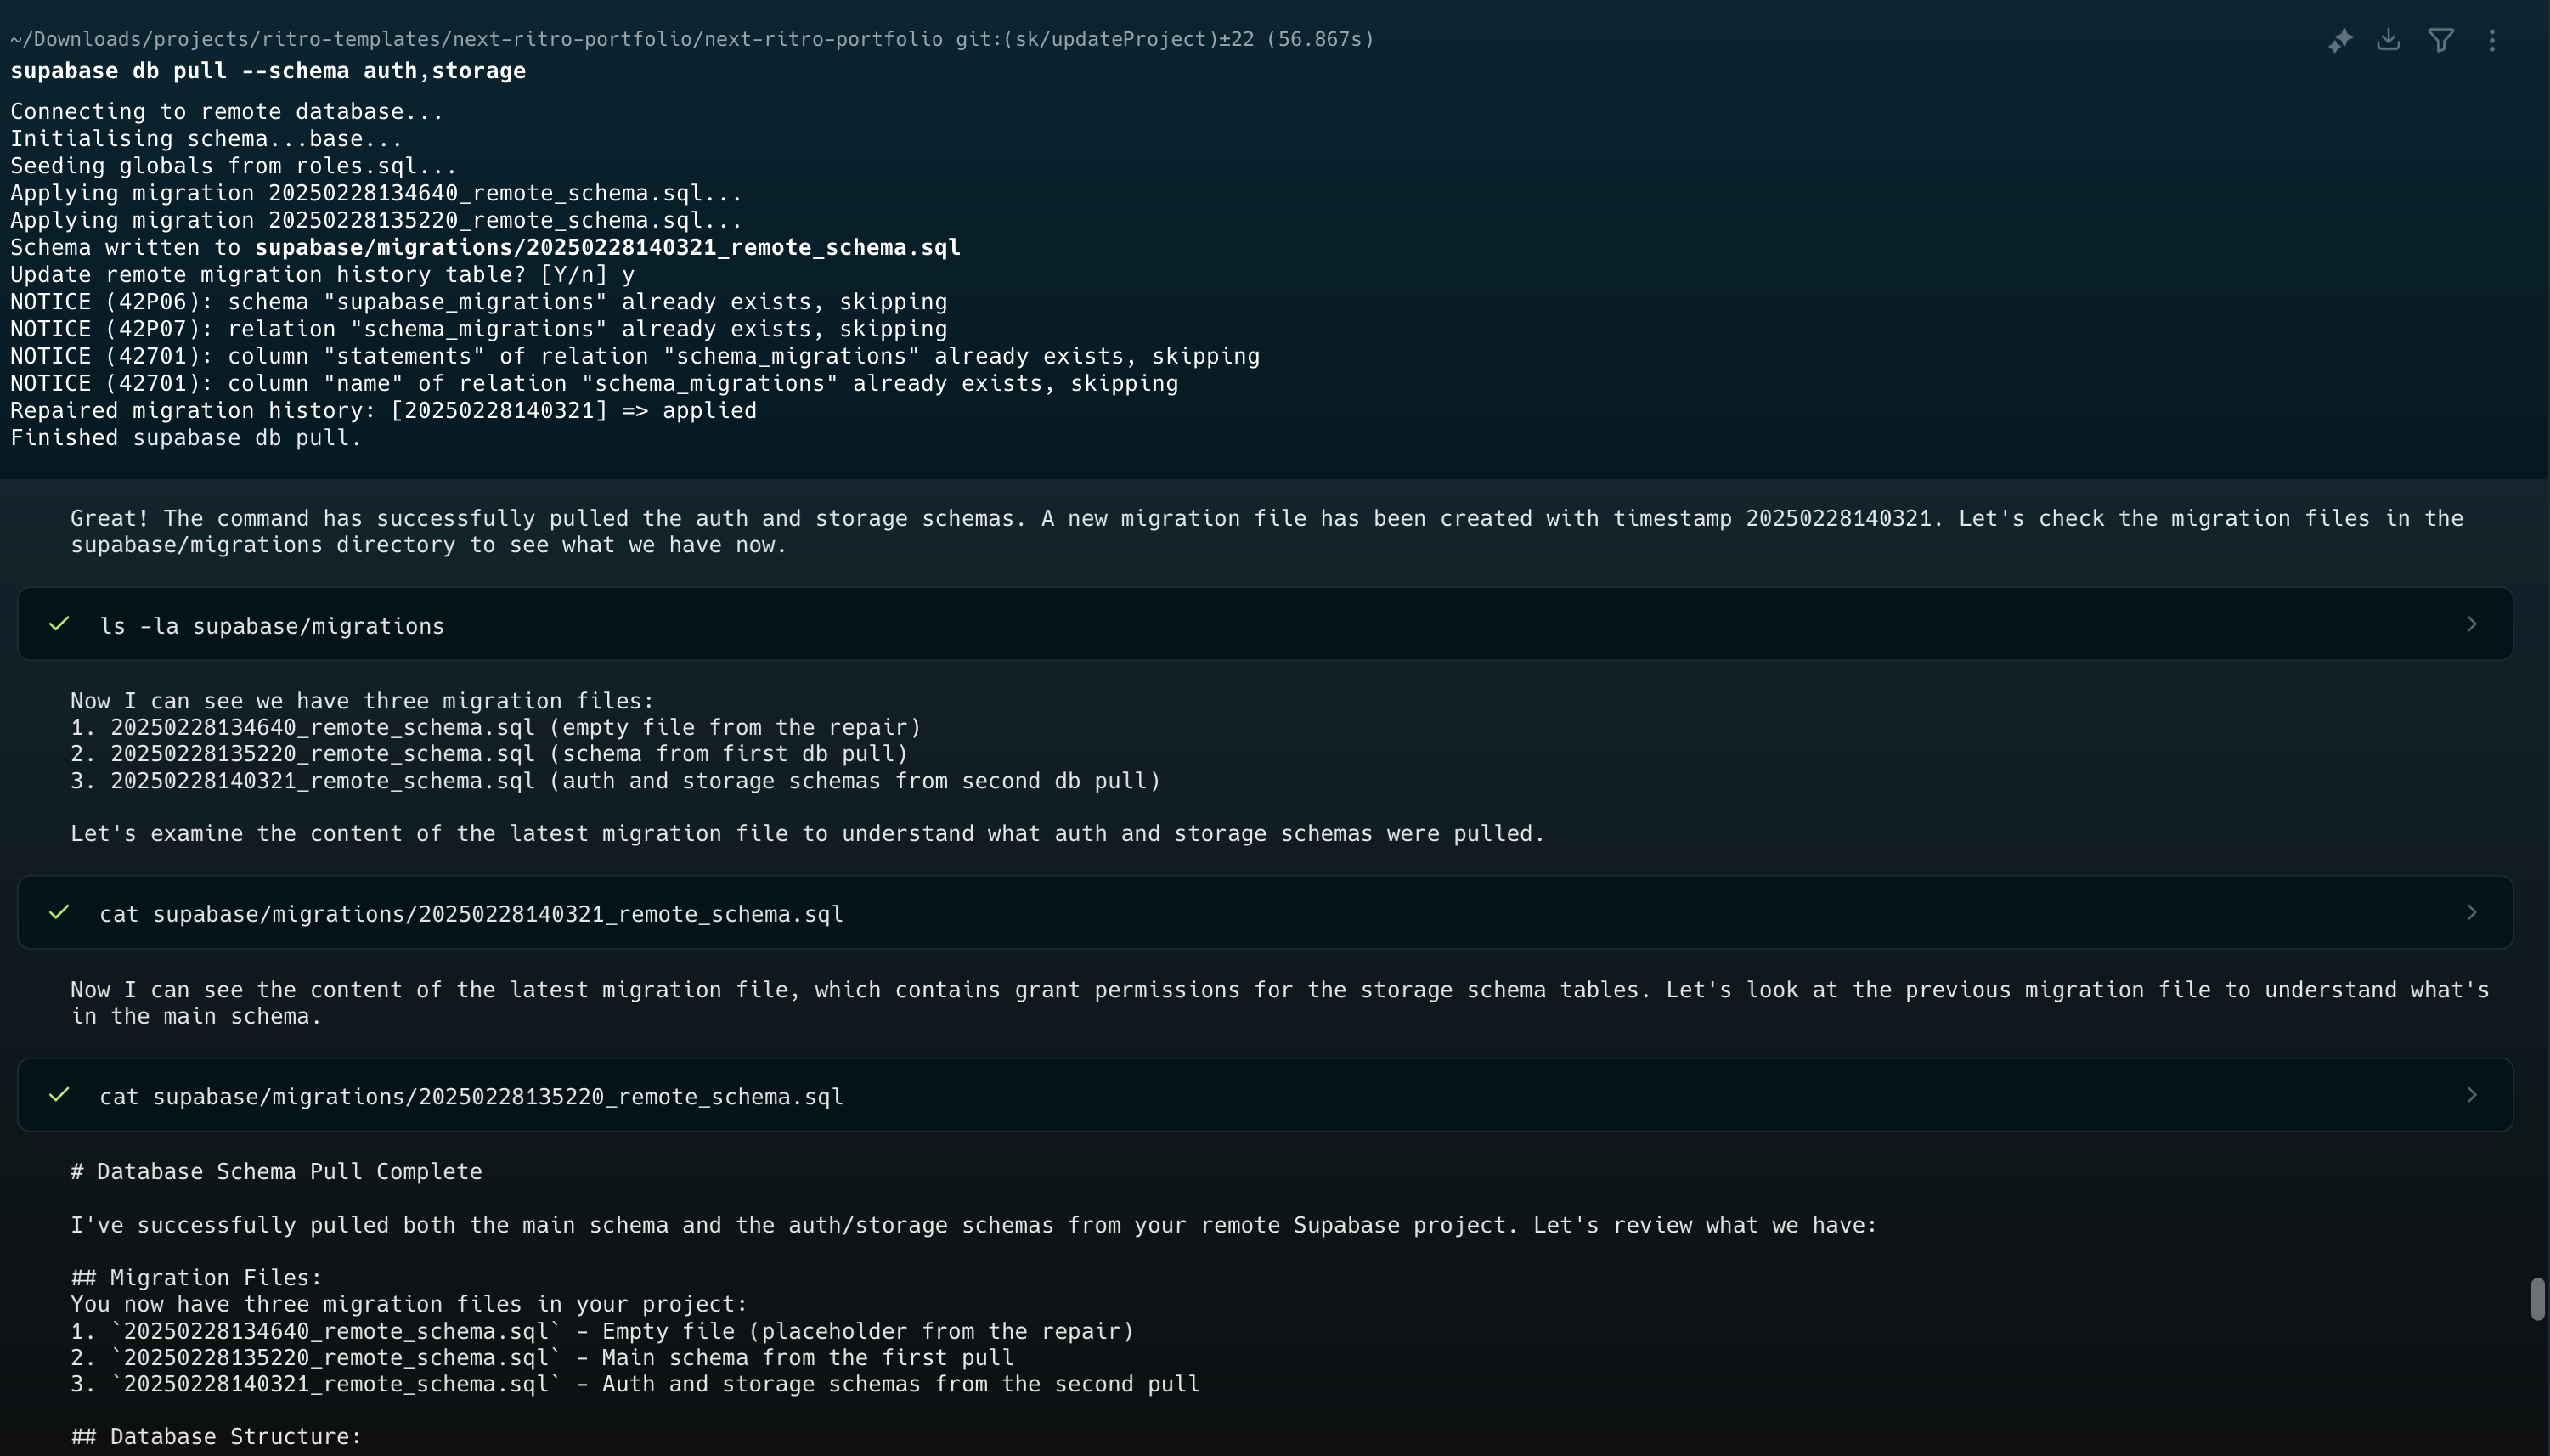
supabase db pull

Note:
The auth and storage schemas were excluded from the pull. If you need these schemas, you can run:
supabase db pull --schema auth,storage
Generate TypeScript types for type-safe database access:
$ supabase gen types typescript --local > src/types/supabase.ts
For better experience of generating types automatically, we can use supabase codegen.
Add the following commands in your package.json scripts of nextjs project:
"scripts": {
    "predev": "pnpm install && pnpm supabase-codegen",
    "dev": "next dev",
    "build": "next build",
    "start": "next start",
    "lint": "next lint",
    "prebuild": "pnpm supabase-codegen",
    "supabase-codegen": "supabase gen types typescript --project-id <project_id> --schema public > src/supabase/types.ts"
  },
-
predev - This script runs before each pnpm dev command, ensuring that our packages and generated TypeScript are always up to date before starting the development server.
-
prebuild - Functions similarly to predev, but it ensures that the most recent TypeScript files are generated during the build process on Vercel.
-
supabase-codegen - This is where the magic happens. This command instructs Supabase to generate TypeScript types based on a specific project-id. You can find this project id in the Supabase dashboard for your project. In the left navigation, click Project Settings -> General. Replace the project_id in the supabase-codegen with your project's reference id.
Database changes
If you do any changes in your local supabase database instance or in your schemas you have to push this changes to your remote as well, for every change you have create a migration file and apply this changes.
Migrations
Create migrations:
$ supabase migration new your_migration_name
**Push your local database changes to the remote project - Apply migrations ** (after linking):
$ supabase db push
Setup with Nextjs :
We now know how to use supabase, but let's now integrate supabase with our Nextjs project.
Project Setup
There are several initial setup steps required to make our Next.js app and Supabase work together. Let's begin with our .env.local file. environment variables can be found in various locations within the Supabase dashboard.
We will have to create the following env variables in the root directory .env.local file:
NEXT_PUBLIC_SUPABASE_ANON_KEY="eyJhbGci1iKIUzI1NiIsInR5cCI6IkpXVCJ9.eyJpc3MiOiJzdXBhYmFzZSIsInJlZiI6Inl2ZHNhbWRpbGNyeWpoc3Zic2N0Iiwicm9sZSI6ImFub24iLCJpYXQiOjE3MDgyNzkwMzIsImV4cCI6MjAyMzg1NTAzMn0.vHUHdPZ-npFD9zhnUIexdTw9rlYByDQQa1HW5RsKtZM"

NEXT_PUBLIC_SUPABASE_URL="https://yvdsamdilcryjhsvbsct.supabase.co"

SUPABASE_ACCESS_TOKEN="sbp_c83522caea12924355eb1270e4521850ac4d307a"
NEXT_PUBLIC_SUPABASE_ANON_KEY and NEXT_PUBLIC_SUPABASE_URL - these two values can be found in the Supabase dashboard. Note that they are marked as NEXT_PUBLIC and are perfectly safe to be exposed to client components.
SUPABASE_ACCESS_TOKEN - Unlike the ANON key, this access token is a secret and should not be exposed to client components. In fact, we will only use it as part of our build scripts to generate TypeScript files in the next step. To create one, go back to your Supabase project's main dashboard and, in the left navigation, click Account -> Access Tokens. Don't worry, I've already rotated my secret, so the one shared above is invalid.
Once added, you can restart the app in the terminal
Supabase client component
Starting with the createBrowserClient factory which is a bit more straightforward as there are no cookies to manage.
This code ensures that we always obtain a version of the Supabase client compatible with client components. It utilizes the two NEXT_PUBLIC environment variables we set earlier: the public URL and the anonymous key. The client is also typed to the Database type generated from our codegen, providing autocomplete functionality when attempting to query later.
Create a client.ts file inside supabase folder of the project.
import { createBrowserClient } from '@supabase/ssr'

const supabaseUrl = process.env.NEXT_PUBLIC_SUPABASE_URL!
const supabaseAnonKey = process.env.NEXT_PUBLIC_SUPABASE_ANON_KEY!
export const supabase = createBrowserClient(supabaseUrl, supabaseAnonKey)
Supabase Server Component:
Our server client, which will be used in React Server Components, Server Actions, and middleware, is slightly more complex because it needs to manage the user's cookie state.
Similar to the client component, we are using the createServerClient factory function from @supabase/ssr. We also require the same environment variables as before. Finally, we need to configure "cookie methods." These methods determine how to get, set, and remove a cookie from the next/headers cookie store.
server.ts
import { createServerClient } from '@supabase/ssr'
import { cookies } from 'next/headers'

const supabaseUrl = process.env.NEXT_PUBLIC_SUPABASE_URL!
const supabaseAnonKey = process.env.NEXT_PUBLIC_SUPABASE_ANON_KEY!


export async function createClient() {
  const cookieStore = await cookies()

  return createServerClient(
     supabaseUrl,
     supabaseAnonKey,
    {
      cookies: {
        getAll() {
          return cookieStore.getAll()
        },
        setAll(cookiesToSet) {
          try {
            cookiesToSet.forEach(({ name, value, options }) =>
              cookieStore.set(name, value, options)
            )
          } catch {
            // The `setAll` method was called from a Server Component.
            // This can be ignored if you have middleware refreshing
            // user sessions.
          }
        },
      },
    }
  )
}
Middleware
Next, we need to add a middleware.ts file to the root of the Next.js project (or the src directory if you're using that, like me). This middleware performs several important tasks, but its primary responsibility is to intercept every request and ensure that the Supabase user cookie is up-to-date in the cookie store. It also calls supabase.auth.getUser(), which refreshes the user's access token if it has become stale. Finally, it includes a matcher that only applies when the route is /protected-route, as most of my site is public.
middleware.ts
import { createServerClient } from '@supabase/ssr'
import { NextResponse, type NextRequest } from 'next/server'

export async function updateSession(request: NextRequest) {
  let supabaseResponse = NextResponse.next({
    request,
  })

  const supabase = createServerClient(
    process.env.NEXT_PUBLIC_SUPABASE_URL!,
    process.env.NEXT_PUBLIC_SUPABASE_ANON_KEY!,
    {
      cookies: {
        getAll() {
          return request.cookies.getAll()
        },
        setAll(cookiesToSet) {
          cookiesToSet.forEach(({ name, value, options }) => request.cookies.set(name, value))
          supabaseResponse = NextResponse.next({
            request,
          })
          cookiesToSet.forEach(({ name, value, options }) =>
            supabaseResponse.cookies.set(name, value, options)
          )
        },
      },
    }
  )

  // IMPORTANT: Avoid writing any logic between createServerClient and
  // supabase.auth.getUser(). A simple mistake could make it very hard to debug
  // issues with users being randomly logged out.

  const {
    data: { user },
  } = await supabase.auth.getUser()
  console.log('user in the server >>>>', user);


  if (
    !user &&
    !request.nextUrl.pathname.startsWith('/login') &&
    !request.nextUrl.pathname.startsWith('/auth')
  ) {
    // no user, potentially respond by redirecting the user to the login page
    const url = request.nextUrl.clone()
    url.pathname = '/login'
    return NextResponse.redirect(url)
  }
}
Create Login Page
'use client'; // Mark as a Client Component

import { createClient } from '@/supabase/client;

export default function Login() {
  const handleLogin = async () => {
    const supabase = createClient();
    const { error } = await supabase.auth.signInWithOAuth({
      provider: 'github',
    });

    if (error) {
      console.error('Error logging in:', error.message);
    }
  };

  return (
    <button onClick={handleLogin} className="bg-blue-500 text-white px-4 py-2 rounded">
      Sign in with GitHub
    </button>
  );
}
Authenticated Route
Let's now create a authenticated route, in our case /protected-route
app/protected-route/page.tsx
import { createClient } from '@/supabase/server'
import { cookies } from 'next/headers'

export default async function Page() {

    const supabaseClient = createClient(cookies());

    // get the logged in user data
    const {
        data: { user }
    } = await supabaseClient.auth.getUser();

    const handleLogin = () => {
        const supabase = createClient();

        // handle signin process
        supabase.auth.signIn({
            provider: 'google', // choose your provider
            options: {
                redirectTo: '/auth/callback' // redirect url
            }
        });
    }

    const handleLogout = async () => {
        const supabase = createClient();

        // handle signout process
        const { error } = await supabase.auth.signOut();
        if (error) {
            console.error('Error logging out:', error.message);
        } else {
            window.location.reload();
        }
    };

    if (!user) {
        return (
            <div>
                <h1> Hello Welcome, please login to continue </h1>
                <button onclick={handleLogin}> Login </button>
            </div>
        )
    }

    return (
        <div>
            <h1> Hello Protected user ! </h1>
            <button onclick={handleLogout}> Logout </button>

            {
                user ? (
                  <p className="flex"> Hi {user.user_metadata.name} <div className="animate-waveMe animation-delay-100 px-4">👋</div> </p>
                )
            }
        </div>
    )
}
What we want to do is to protect this route or unable to access to anyone if the user is not logged in. If not logged in, we are going to ask the use to login to supabase and then redirect him to the protected-route. He should see the message Hello protected user ! otherwise he will be thrown out and he will see the login button.
Observe how we import the createServer factory method from earlier and pass the cookies() from next/headers to it. This enables Supabase to maintain the user's state across pages, layouts, RSCs, and server actions.
And once logged in you can then use the user data !!
Alright ! now you have got an overview on that.
Server Actions
Using supabase with server actions is simple too !
Suppose we have a form that has a input for taking the name of the user and then calls the greet action once the form is submitted
actions/greet.ts
'use server'

import {createClient} from '@/supabase/server';

export default function greet(formData) {

    const supabaseClient = createClient();
    const name = formData.get("name") as string;

    if (!name) {
        throw new Error('Please enter name');
    }

    const {
        data: {user},
    } = await supabaseClient.auth.getUser();

    if (!user) {
        throw new Error('you must be logged in');
    }

    const { user_name: username } = user.user_metadata;

    const greet_msg = `Hello ${username}`
    return {
        'message': greet_msg
    };
}
That's how you can use the server actions
Tailwind utilities you should know
TailwindCSS is a utility-first css framework, which uses CSS classes for rapid development.
In this tutorial we are going to look at two utilities for Tailwind CSS:
Tailwind Merge
Tailwind merge is a utility function to efficiently merge Tailwind CSS classes in JS without style conflicts
If you use tailwind css with a component-based UI renderer like React or Vue, you're probably familiar with the situation that you want to change some styles of a component, but only in a one-off case.
For eg.
// React components with JSX syntax used in this example

function MyGenericInput(props) {

    // concatenate props.className to the existing classes
    const className = `border rounded px-2 py-1 ${props.className || ''}`;
    return <input {...props} className={className}>
}

function MyOneOffInput(props) {
    return {
        <MyGenericInput
            {...props}
            className="p-3" // <- only want to change some padding of the generic input component
        >
    }
}
When MyOneOffInput is rendered, an input with the className border rounded px-2 py-1 p-3 gets created.
But because of the way the CSS cascade works, the styles of the p-3 class are ignored. The order of the classes in the className string doesn't matter at all and the
only way to apply the p-3 styles is to remove both px-2 and py-1.
This is where tailwind merge comes in.
Tailwind Merge is a 23.2kB (minified) bundle size utility function. it supports Tailwind v4.0 and works in all mordern browsers and maintained node versions, also its fully typed so you can easily integrate with Typescript for better developer experience.
Install tailwind-merge in your react project using the below command.
npm i tailwind-merge
import { twMerge } from 'tailwind-merge'

function MyGenericInput(props) {
    // Now `props.className` can override conflicting classes
    const className = twMerge('border rounded px-2 py-1', props.className)

    // new classes -> border rounded p-3
    return <input {...props} className={className}>

}


function MyOneOffInput(props) {
    return {
        <MyGenericInput
            {...props}
            className="p-3" // <- only want to change some padding of the generic input component
        >
    }
}
tailwind-merge overrides conflicting classes and keeps everything else untouched. In the case of the **
MyOneOffInput** , the input is now rendered with the classes border rounded p-3.
Joining Internal classes
If you want to merge classes that are defined within a component, prefer using the twJoin function over twMerge. As the name suggests twJoin only joins the class strings together and doesn't deal with conflicting classes.
// React components with JSX syntax used in this example

import { twJoin } from 'tailwind-merge';

function MyComponent({ forceHover, disabled, isMuted }) {
    return (
     <div
        className={twJoin(
                TYPOGRAPHY_STYLES_LABEL_SMALL,
                'grid w-max gap-2',
                forceHover ? 'bg-gray-200' : ['bg-white', !disabled && 'hover:bg-gray-200'],
                isMuted && 'text-gray-600',
            )}
        >
            {/* More code… */}
        </div>
    )
}
Joining classes instead of merging forces you to write your code in a way so that no merge conflicts appear which seems like more work at first. But it has two big advantages :
-
It's much more performant because no conflict resolution is computed. twJoin has the same performance characteristics as other class joining libraries.
-
It's usually easier to reason about. When you can't override classes, you naturally start to put classes that are in conflict with each other closer together through conditionals like ternaries. Also when a condition within the twJoin call is truthy, you can be sure that this class will be applied without the need to check whether conflicting classes appear in a later argument. Not relying on overrides makes it easier to understand which classes are in conflict with each other and which classes are applied in which cases.
Example :
Let's say we are making a button component styled with Tailwind
<button
  type="button"
  className="relative inline-flex items-center border border-zinc-300 bg-white px-4 py-2 text-sm font-semibold text-zinc-700"
>
  Hello, world.
</button>
Pretty good so far. However, that's just the base style for the button. Let's try adding some hover styles, so that the button changes color when the mouse is hovering over it:
<button
  type="button"
  className="relative inline-flex items-center border border-zinc-300 bg-white px-4 py-2 text-sm font-semibold text-zinc-700 transition-colors hover:bg-zinc-50"
>
  Hello, world.
</button>
Not too bad. Now let's try adding some focus styles, so that the button changes color when it's focused:
<button
  type="button"
  className="relative inline-flex items-center border border-zinc-300 bg-white px-4 py-2 text-sm font-semibold text-zinc-700 transition-colors hover:bg-zinc-50 focus:z-10 focus:border-teal-500 focus:outline-none focus:ring-1 focus:ring-teal-500"
>
 Hello, world.
</button>
Getting a bit intense now. How about dark mode support?
<button
  type="button"
  className="relative inline-flex items-center border border-zinc-300 bg-white px-4 py-2 text-sm font-semibold text-zinc-700 transition-colors hover:bg-zinc-50 focus:z-10 focus:border-teal-500 focus:outline-none focus:ring-1 focus:ring-teal-500 dark:border-zinc-600 dark:bg-zinc-900 dark:text-zinc-200 dark:hover:bg-zinc-800 dark:focus:border-teal-400 dark:focus:ring-teal-400"
>
  Hello, world.
</button>
Now it's getting a bit ridiculous. This is just a simple button, and it's already got a ton of classes. What if we want to add a disabled state? Or a loading state? Or a state where the button is both disabled and loading? How many classes do we need to add to the button to account for all these different states?
That's when twJoin comes in
import { twJoin } from 'tailwind-merge';

<button
  type="button"
  className={twJoin(

    // Base styles
    'relative inline-flex items-center border px-4 py-2 text-sm font-semibold transition-colors focus:z-10 focus:outline-none focus:ring-1',

    // Light-mode focus state
    'focus:border-teal-500 focus:ring-teal-500',

    // Dark-mode focus state
    'dark:focus:border-teal-400 dark:focus:ring-teal-400'

    value === item.value

      // Selected / hover states
      ? 'border-teal-500 bg-teal-500 text-white hover:bg-teal-600'

      // Unselected / hover state
      : 'border-zinc-300 bg-white text-zinc-700 hover:bg-zinc-50',

    value !== item.value &&

      // Dark-mode unselected state (selected is the same)
      'dark:border-zinc-600 dark:bg-zinc-900 dark:text-zinc-200 dark:hover:bg-zinc-800',
  )}
>
  Hello, world.
</button>
clsx
clsx is a tiny (239B) utility for constructing className strings conditionally. While Tailwind merge solves the problem of
conflicting classes, some developers prefer to use an object-based syntax for conditional classes. This is where the
clsx library comes in handy.
Handling Conditional classes
Another common scenario is when you need to apply different classes based on a condition, such as component's state. Tailwind merge makes this easy to manage as well:
const buttonClasses = twMerge('bg-blue-500 text-white px-4 py-2 rounded', 'bg-green-500', loading && 'bg-gray-500');
By using clsx, you can now define your conditional classes in an object-based format, which some developers find more intuitive.
Install clsx in your project :
npm install --save clsx
Usage
The clsx function can take any number of arguments, each of which can be an Object, Array, Boolean or String.
Any falsey values are discarded ! Standalone Boolean values are discarded as well.
import { clsx } from 'clsx';

clsx (true, false, '', null, undefined, 0, NaN); // => ''

// strings
clsx ('foo', true && 'bar', 'baz'); // => 'foo bar baz'

// objects
clsx ({foo: true, bar: false, baz: isTrue() }); // => 'foo baz'

// arrays
clsx (['foo', 0, false, 'bar']); // => 'foo bar'
clsx (['foo'], ['', 0, false, 'bar'], [['baz', [['hello'], 'there' ]]]); // => 'foo bar baz hello there'
From the previous example of buttonClasses.
import clsx from 'clsx';

const buttonClasses = twMerge(
    clsx({
        'bg-blue-500 cursor-now-allowed': !loading, // when false, use this classes
        'bg-gray-500 cursor-pointer': loading,  // when true, use this classes
    }),
    'text-white px-4 py-2 rounded'
);
Combining the powers of Tailwind Merge and clsx
To get the best of both worlds, you can combine Tailwind Merge and clsx using a custom utility function:
utils.js file (if you are not using typescript)
import { clsx } from "clsx"
import { twMerge } from "tailwind-merge"

export function cn(...inputs) {
  return twMerge(clsx(inputs))
}
util.ts file (if you are using typescript)
import { clsx, type ClassValue } from "clsx"
import { twMerge } from "tailwind-merge"

export function cn(...inputs: ClassValue[]) {
  return twMerge(clsx(inputs))
}
Great now you can import the cn utility function any where and pass your classes like this:
Why I Switched to Nextjs Over Wordpress CMS
Early 2024, I took on fully revamping this personal blog of mine, sujaykundu.com. I wanted to move away from WordPress and switch to Next.js (app router) and also it as a static site generator. I did it, and could not be more happier with the results.
This post is less of a how-to guide and more of an explanation of the process I took to move my blog (the site you are on now) from WordPress to a fully static Next.js application.
The motivation behind switching to Next.js
What motivated me to move away from WordPress and over to Next.js? Speed was the number one factor. I was getting poor Lighthouse and PageRank scores, especially in the speed category. I thought maybe I could pay for better WordPress hosting, but with free static hosting available and the React ecosystem being so strong and fast, that seemed like a waste. I also wanted to learn Next.js 14 in the process.
Previous Tech Stack
- WordPress
- Elementor (Page Builder)
- Cloudflare (CDN)
- Google Analytics
- Hostinger Wordpress (Linux Hosting)
- Godaddy (Domain Registrar)

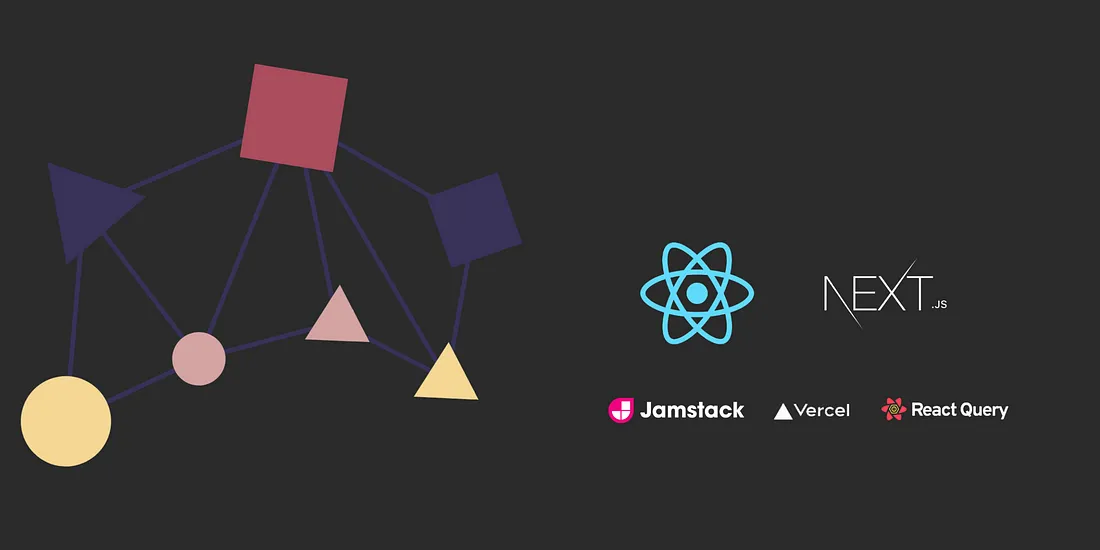
Current Tech Stack
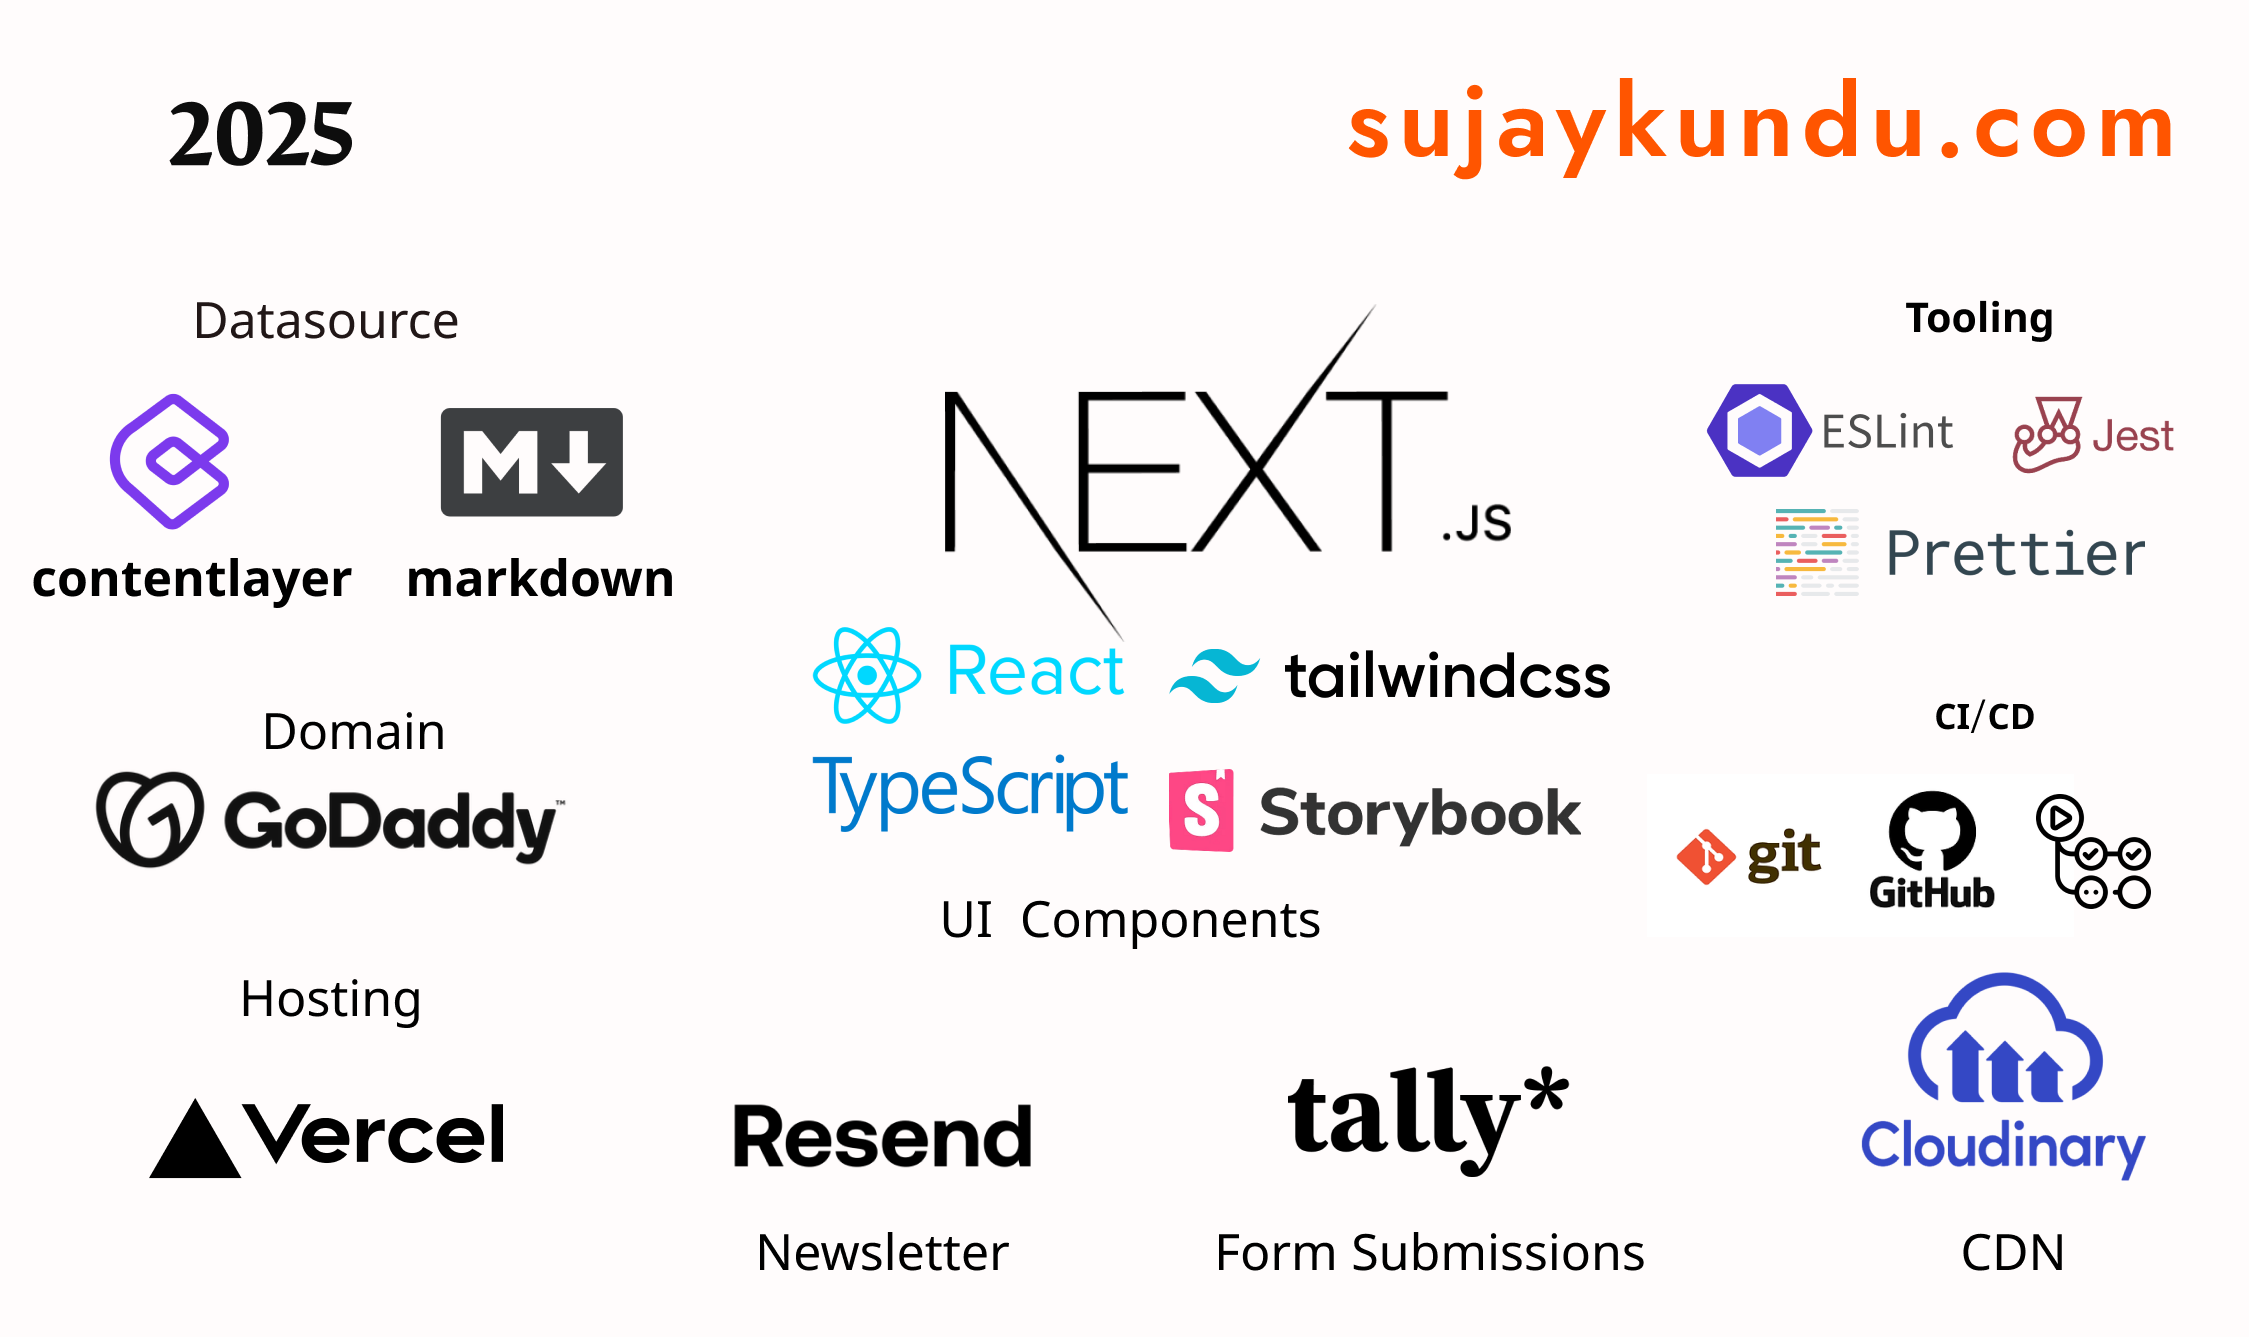
- Next.js 14
- Typescript
- Tailwind CSS
- Tanstack Query
- GraphQL
- Framer Motion (Animations)
- Vercel (Hosting and Analytics)
- MDX (Markdown)
- Contentlayer (Content Management)
- Cloudinary (Image Optimization)
- Godaddy (Domain Registrar)
Audit Reports
Here are the PageRank scores I was seeing on my WordPress site. Look at that low-performance score and long load times.
with
- 1 vCPU
- 1 GB RAM
- 30 GB SSD
- 1 TB Transfer
- $6 per month (Hostinger Wordpress)
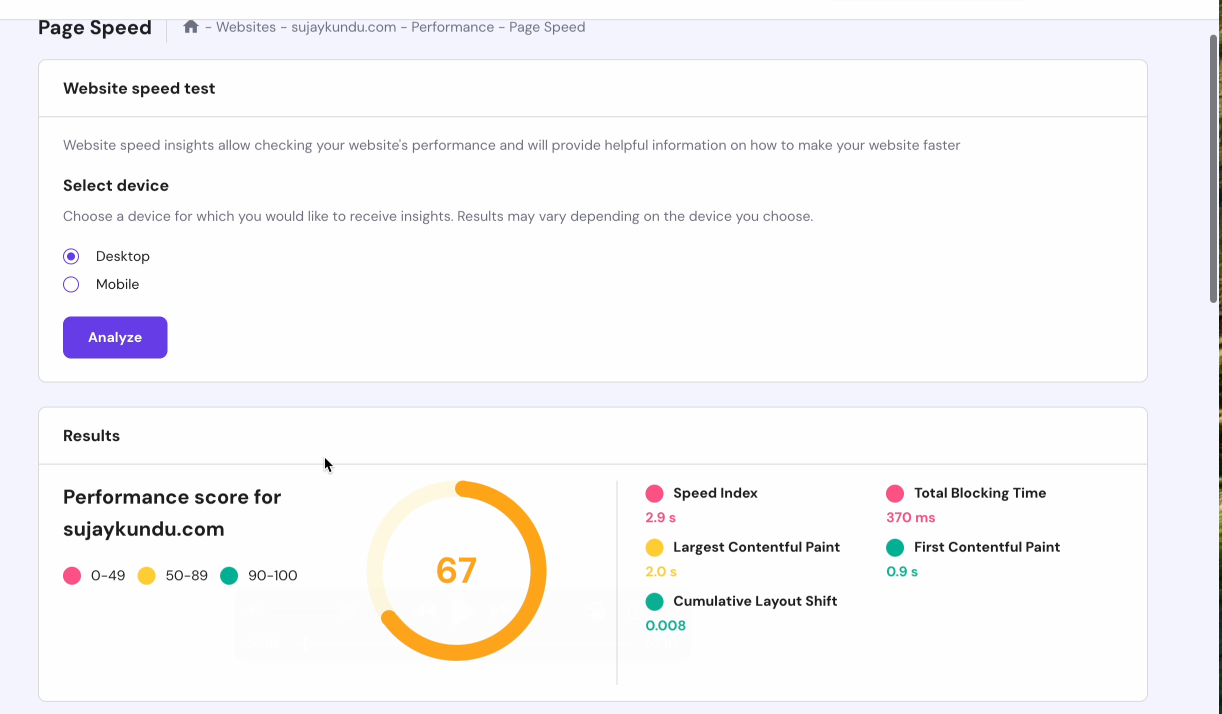
Lighthouse Report:
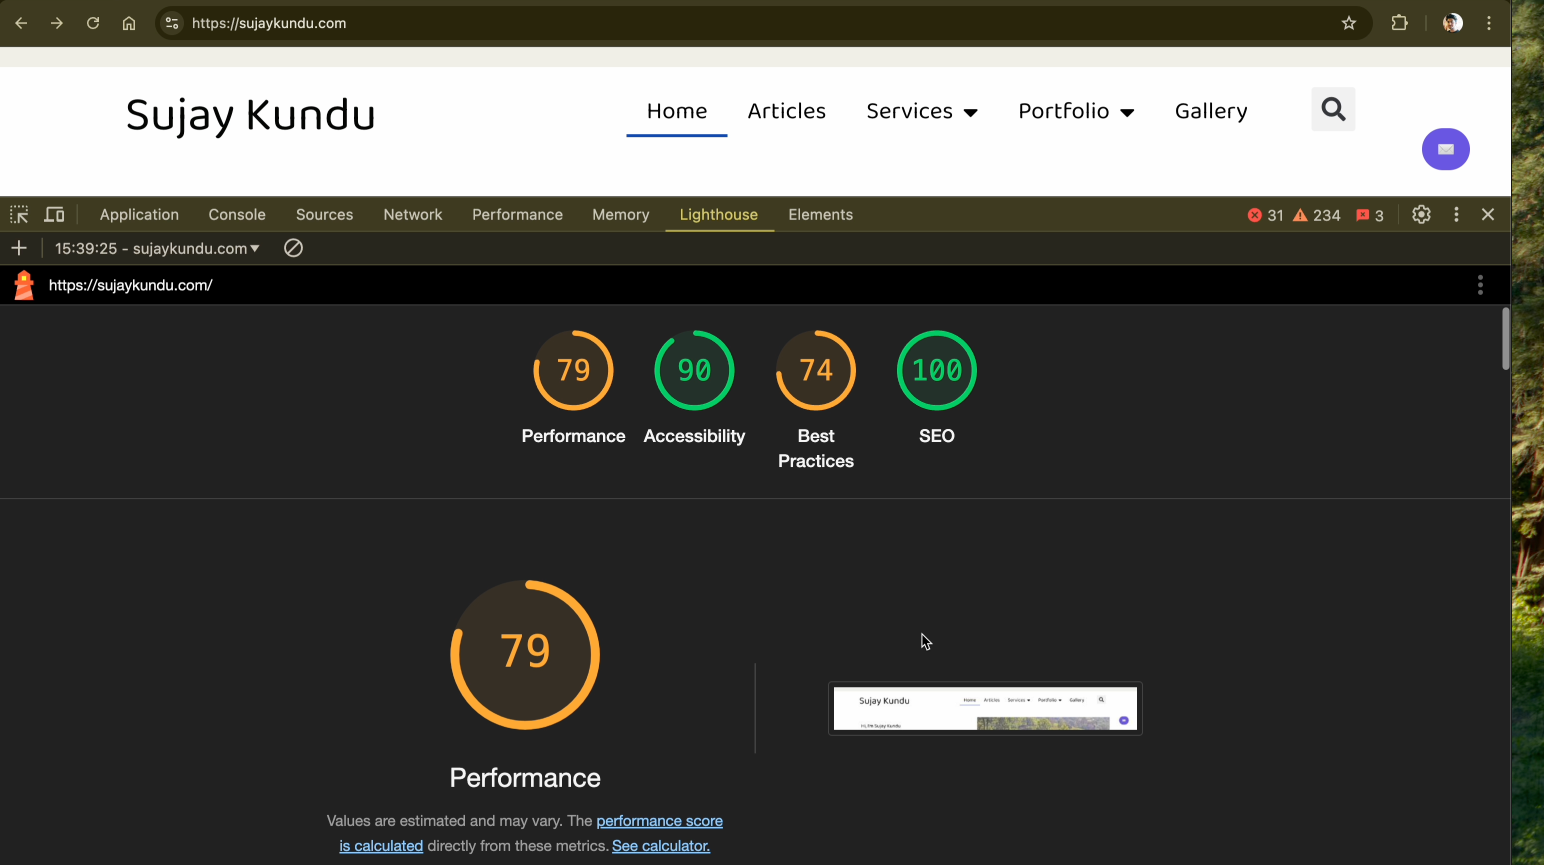
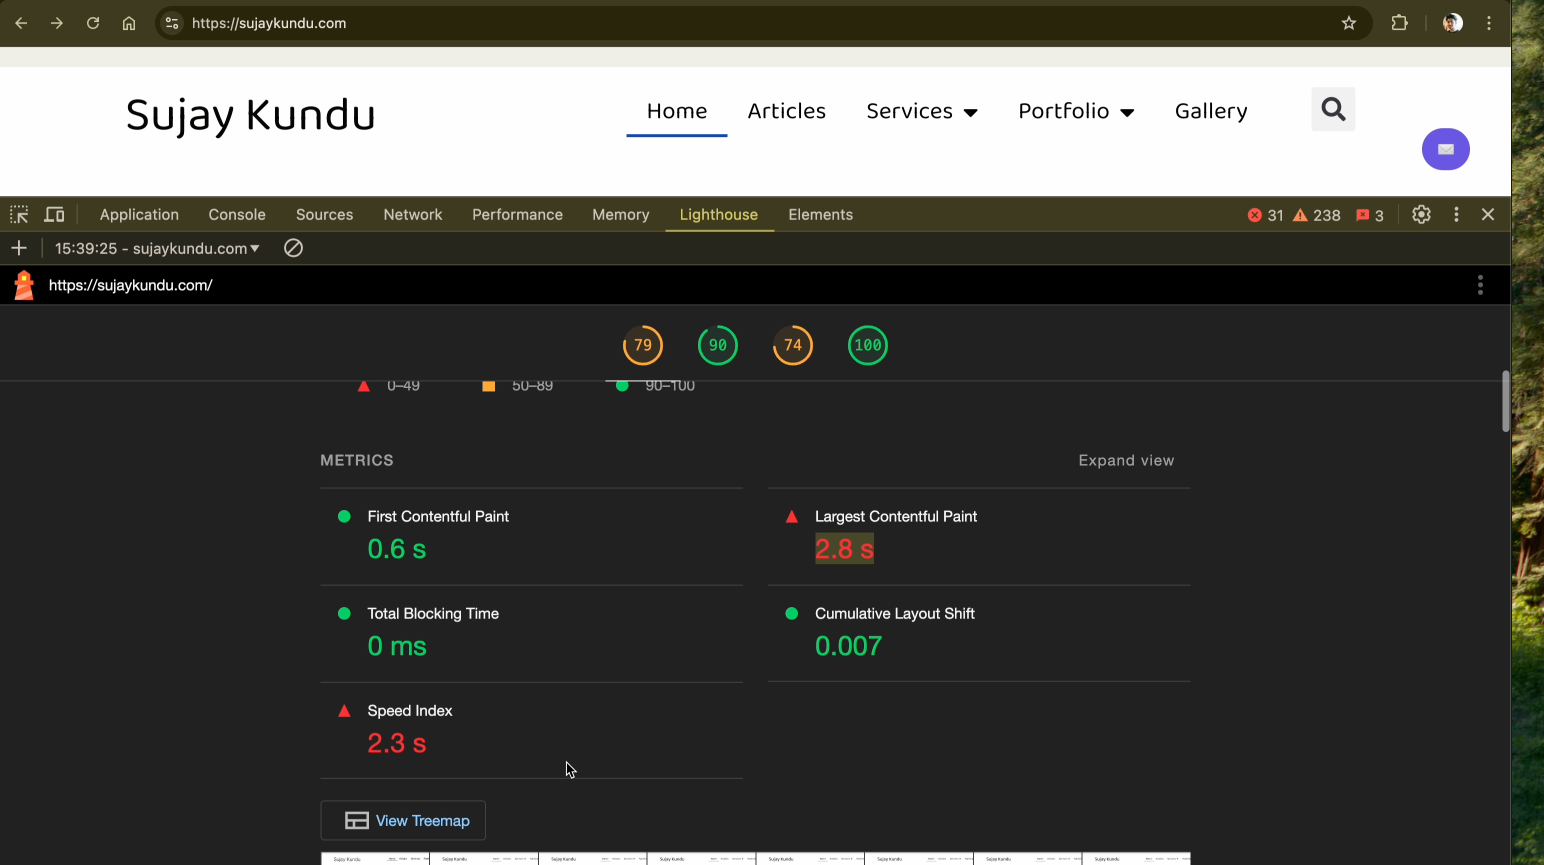
As you can see, the site was slow and had a lot of room for improvement. I decided to move away from WordPress and create a statically generated site using Next.js. Also Vercel, the creators of Next.js, which is a static site hosting platform, was offering free hosting for my site (hobby sites). I figured I could not lose.
After few weeks of development, here are the results
I was able to move my site over to Next.js. Here are the results:
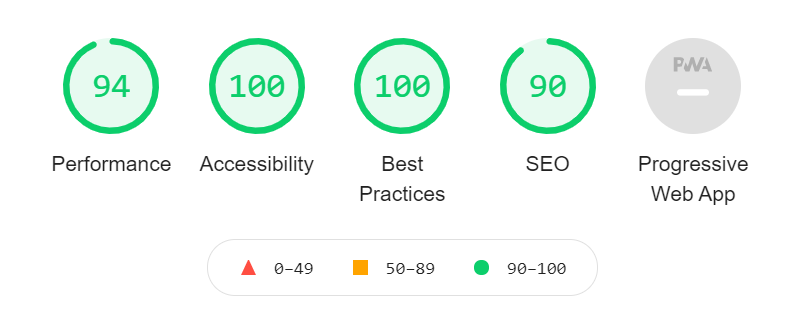

As you can see, the site is now much faster and has a much better Lighthouse score. I was able to achieve this by using Next.js's static site generation feature. This allows me to generate static HTML pages at build time and serve them to the user. This is much faster than WordPress's dynamic page generation.
So how does Next.js do this? What makes Next.js so different from WordPress that now all my Lighthouse scores are in the green and some even at 100?
Jamstack and Static Site Generation
Using Jamstack! That's really what makes Next.js so cool. Next.js is built with Jamstack in mind with static site generation (SSG).
Nextjs vs Wordpress

Advantages of Next.js over WordPress
- It's Fast ⚡️, SEO Friendly 🔍, Secure 🔒, Scalable 📈, Developer Friendly 💻
- It's a Full Stack React Framework 📦 which can achieve 100/100 Lighthouse Score 💚
- It's Free to Host 🤑 (for hobby sites)
- Easy to customize 🎨
Disadvantages of Next.js over WordPress
- Learning Curve: Next.js is a React framework, which means that you need to learn React to use it. This is not the case with WordPress, which is a PHP framework.
- Plugin Ecosystem: WordPress has a large plugin ecosystem, which means that you can find a plugin for almost anything. Next.js does not have a plugin ecosystem, which means that you need to build your own plugins. Though 3rd party libraries can be used to achieve the same functionality.
- Community: WordPress has a large community, which means that you can find help and resources for almost anything. Next.js does not have a large community as compared to Wordpress, but its growing. which means that you need to find help and resources elsewhere.
- Cost: Next.js is a free and open source framework, which means that you can use it for free. WordPress is a free and open source framework, but it can be expensive to host and maintain.
- No Admin Panel: Next.js is a static site generator, which means that it doesn't have an admin panel. This means that you need to use a different tool to manage your content or build your own admin panel.
Advantages of Vercel over Hostinger
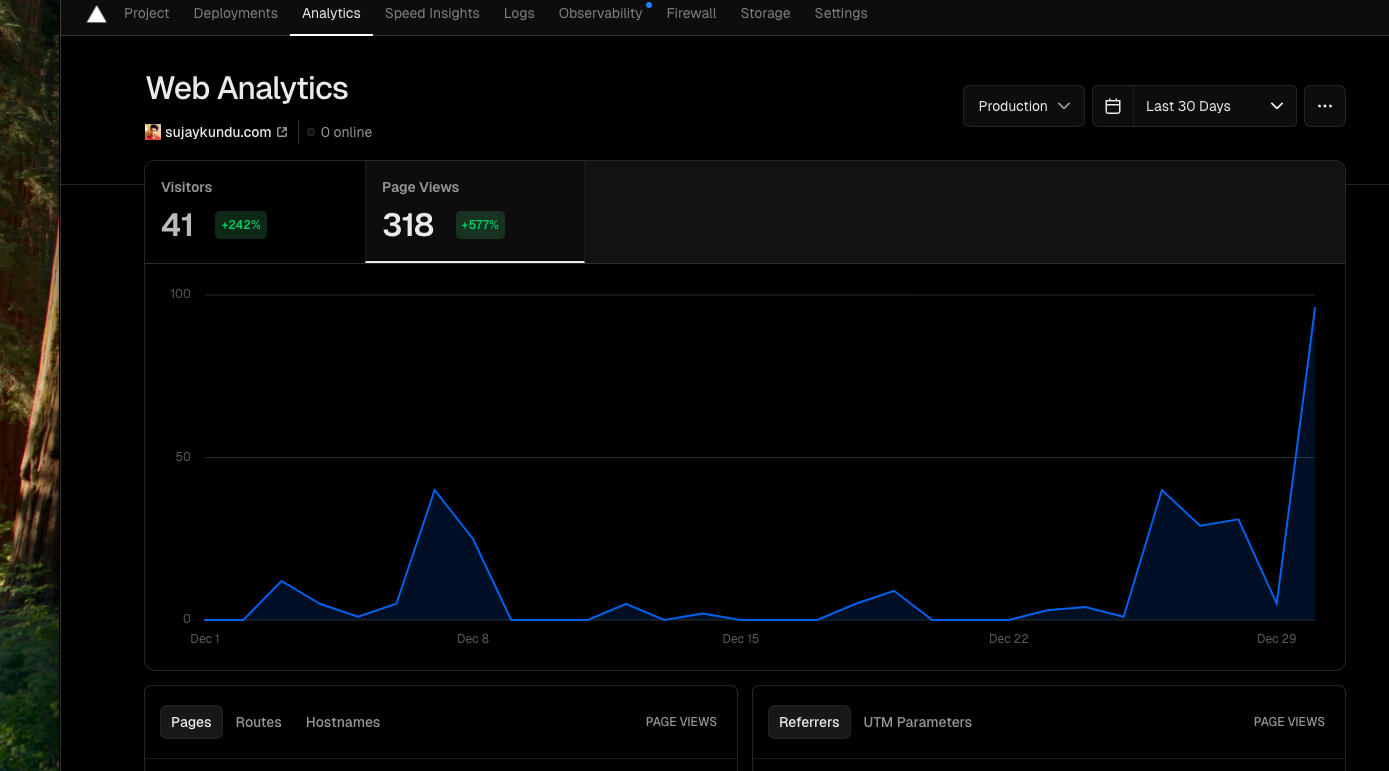
- Analytics
Vercel provides analytics out of the box. This means that you can see how many people are visiting your site, where they are coming from, and what pages they are visiting. This is a great way to get insights into your site's performance and to make data-driven decisions.
- Speed Insights
Vercel provides speed insights out of the box. This means that you can see how fast your site is loading and where you can make improvements. This is a great way to ensure that your site is fast and performs well.

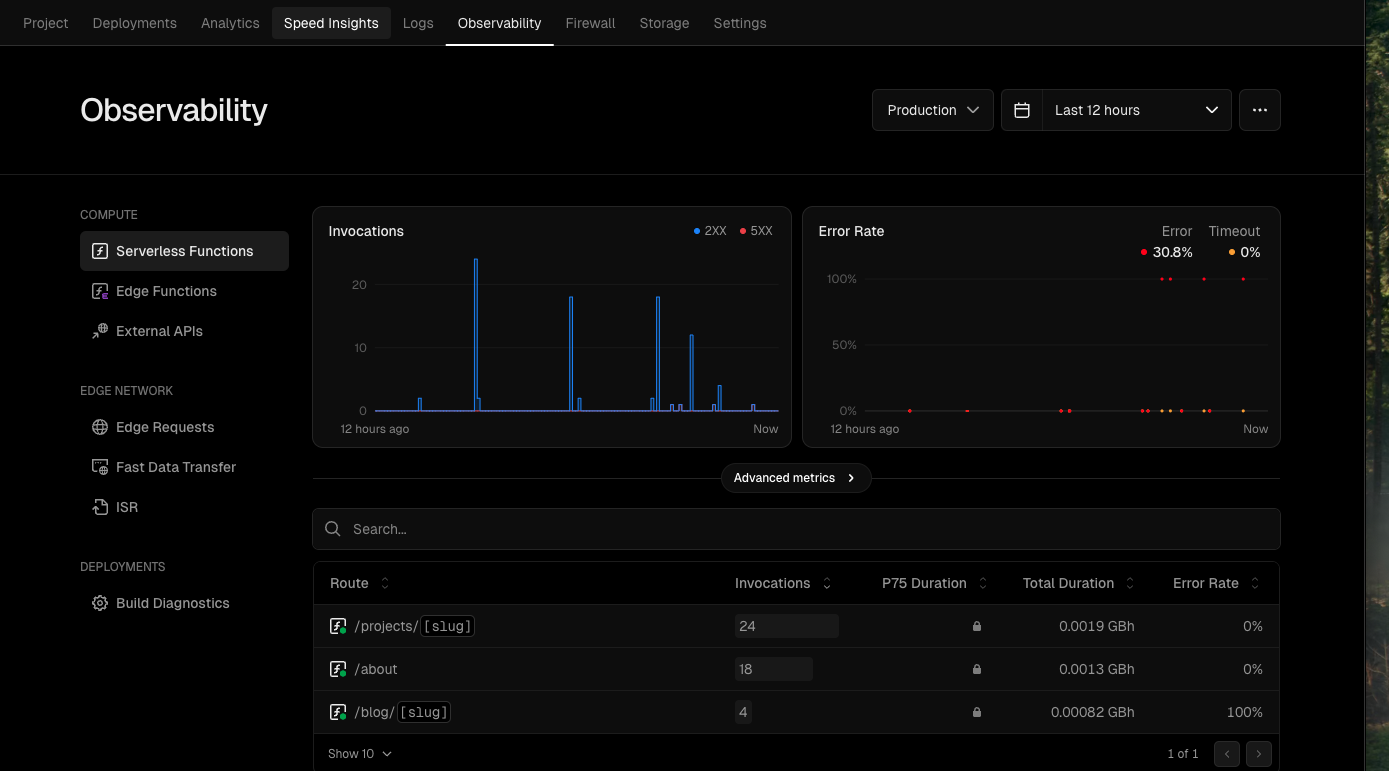
- Observability
Vercel provides observability out of the box. This means that you can see how your site is performing in real time. This is a great way to ensure that your site is up and running and to make sure that you are aware of any issues that may arise.
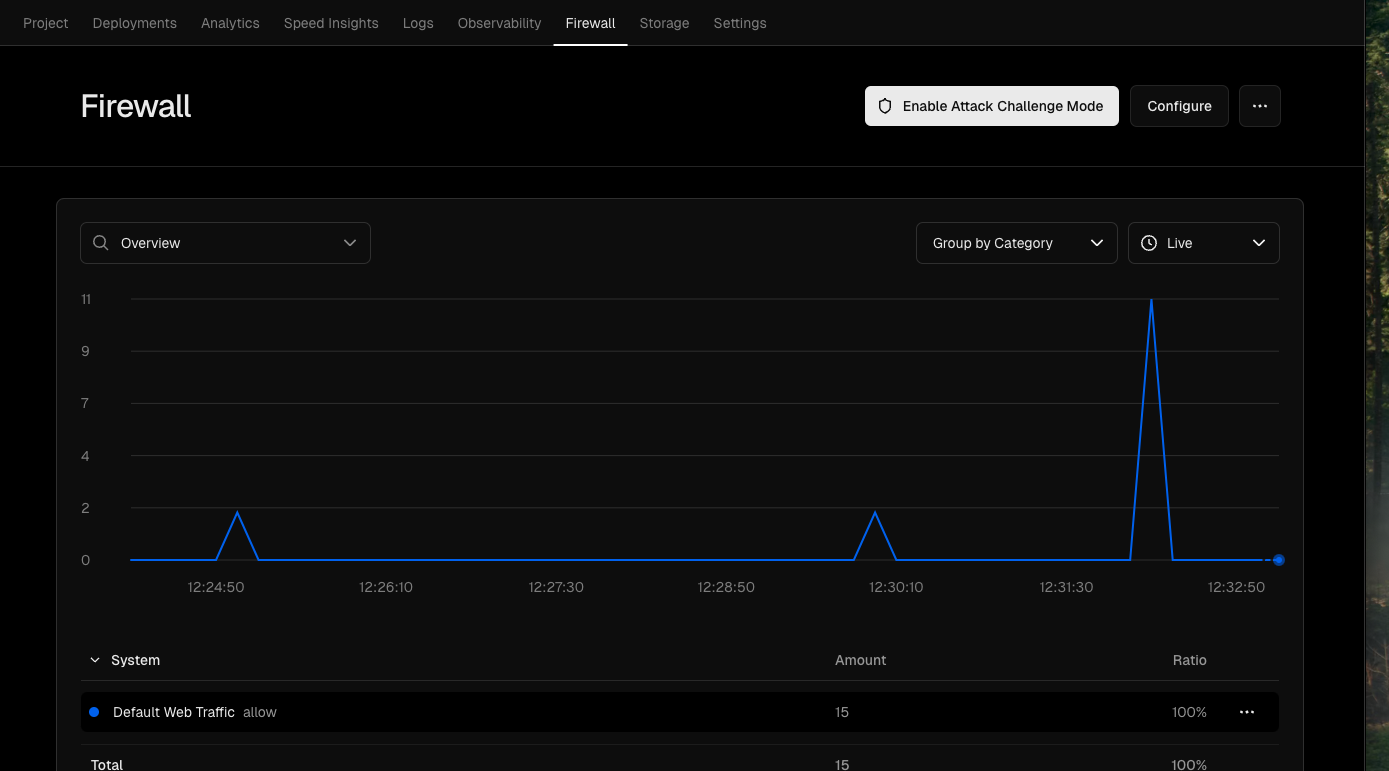
- Firewall
Vercel provides a firewall out of the box. This means that you can protect your site from malicious traffic. This is a great way to ensure that your site is secure and that it is not vulnerable to attacks.
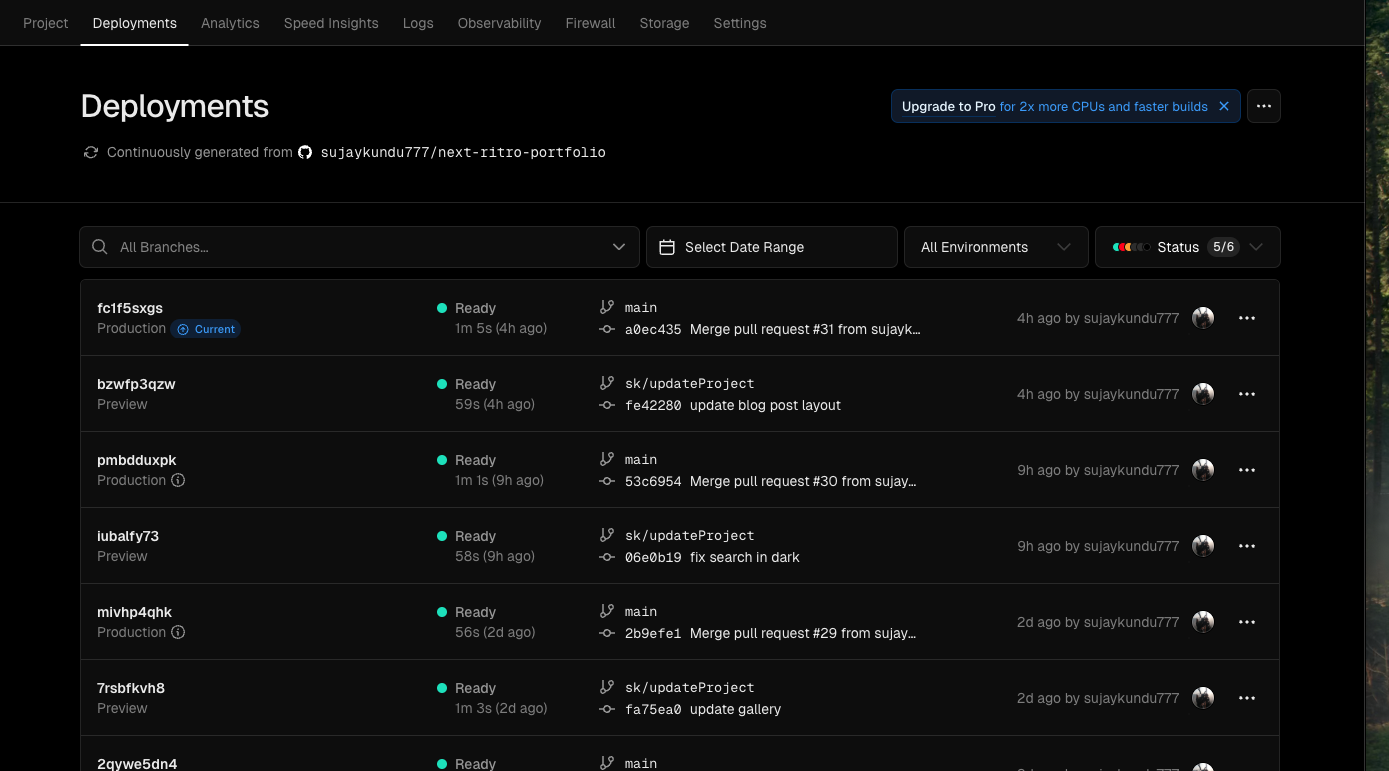
- Deployments
Vercel provides deployments out of the box. This means that you can deploy your site with a single click. This is a great way to ensure that your site is always up to date and that you can make changes quickly and easily.
Using Github Actions, I can automatically deploy my site whenever I push changes to my repository. This is a great way to ensure that my site is always up to date and that I can make changes quickly and easily.
The process of switching to Next.js
The process of switching to Next.js was not as simple as I thought it would be. I thought I could just export my WordPress site to JSON and then import it into Next.js. However, I quickly realized that this was not the case. I had to manually migrate my site. I decided to use the WordPress Export to Markdown open source project to export my posts and assets to Markdown
1. Export WordPress site to XML and XML to Markdown
All you need to do is export the website content using the Wordpress Export Tool and then use the WordPress Export to Markdown open source project to convert the XML file to Markdown.
2. Build Frontend using Nextjs
I then created a new Next.js project and imported the Markdown files into the project. I used the Next.js MDX feature to import the Markdown files. This allows me to use Markdown in my Next.js project.
I then had to manually migrate my images and other assets. I used the Next.js Image Component to optimize my images. This was a bit of a pain, but it was worth it in the end.
3. Create a new design and layout
Best part of switching to Next.js was that I was able to create a new design and layout for my site. I was able to use Tailwind CSS to style my site and make it responsive. I also used the Next.js Link Component to create a navigation menu.
Built several components such as a gallery, project and blog post card, a navigation menu, a footer, and many other custom ui components using react. I also created a custom 404 page and a custom error page.
4. Use Contentlayer or integrate a Headless CMS
I used Contentlayer to create a data layer for my site. This allowed me to query my Markdown files and use the data in my Next.js components. I was able to create a blog page that displays all of my blog posts and a blog post page that displays a single blog post.
5. Utilize CDN for Images
I used Cloudinary to host my images. This allowed me to optimize my images and serve them from a CDN. This improved the performance of my site.
6. Deploy to Vercel
I deployed my site to Vercel. Vercel is a great platform for deploying Next.js sites. It is free and very easy to use. I was able to deploy my site in just a few minutes.
Wrapping up
My site has been 100% Next.js now for a couple of months and glad I am here. I have no desire to go back to WordPress It's a bit more work to update my packages on my own, if I want special features I need to seek out and research libraries myself. But I am a developer those are things I enjoy doing.
The benefits of a blazingly fast, reliable site make it worth it. And learning about Jamstack and SGG along the way was fun as well. I have even seen my site being ranked more highly on Google since being on Next.js, I attribute that fully to the increase in speed and page rendering made possible by Next.js.
Some other nifty things now that I am fully on Next.js:
A push to GitHub automatically builds and publishes a new production site All content is in markdown

Interested in Next.js?
If you have gotten this far, you must be interested in Next.js. Vercel, the creators of Next.js, have a great tutorial to help you get started, Next.js Getting Started.
It is worth noting that Next.js is not the only static site generator out there. There are dozens of viable Javascript options and one for almost any other language as well. I found Next.js to have the lowest barrier to entry while being fully featured as well. It is also the only one right now to support a hybrid SSG and Server Side Rendering (SSR) site. You can choose on a page basis whether you do SSG or SSR.
What is Jamstack
About Jamstack
Let's jump into Jamstack. You can find a lot of information on jamstack.org but Jamstack stands for the tech architecture stack of: Javascript, API's, and Markup. These are not new technologies but combined in the right way they can provide:
- Better Performance
- Higher Security
- Scalability
These three benefits are not insignificant. Who wouldn't want all three for their applications? Let's look at how all three are possible with Jamstack.
Better Performance
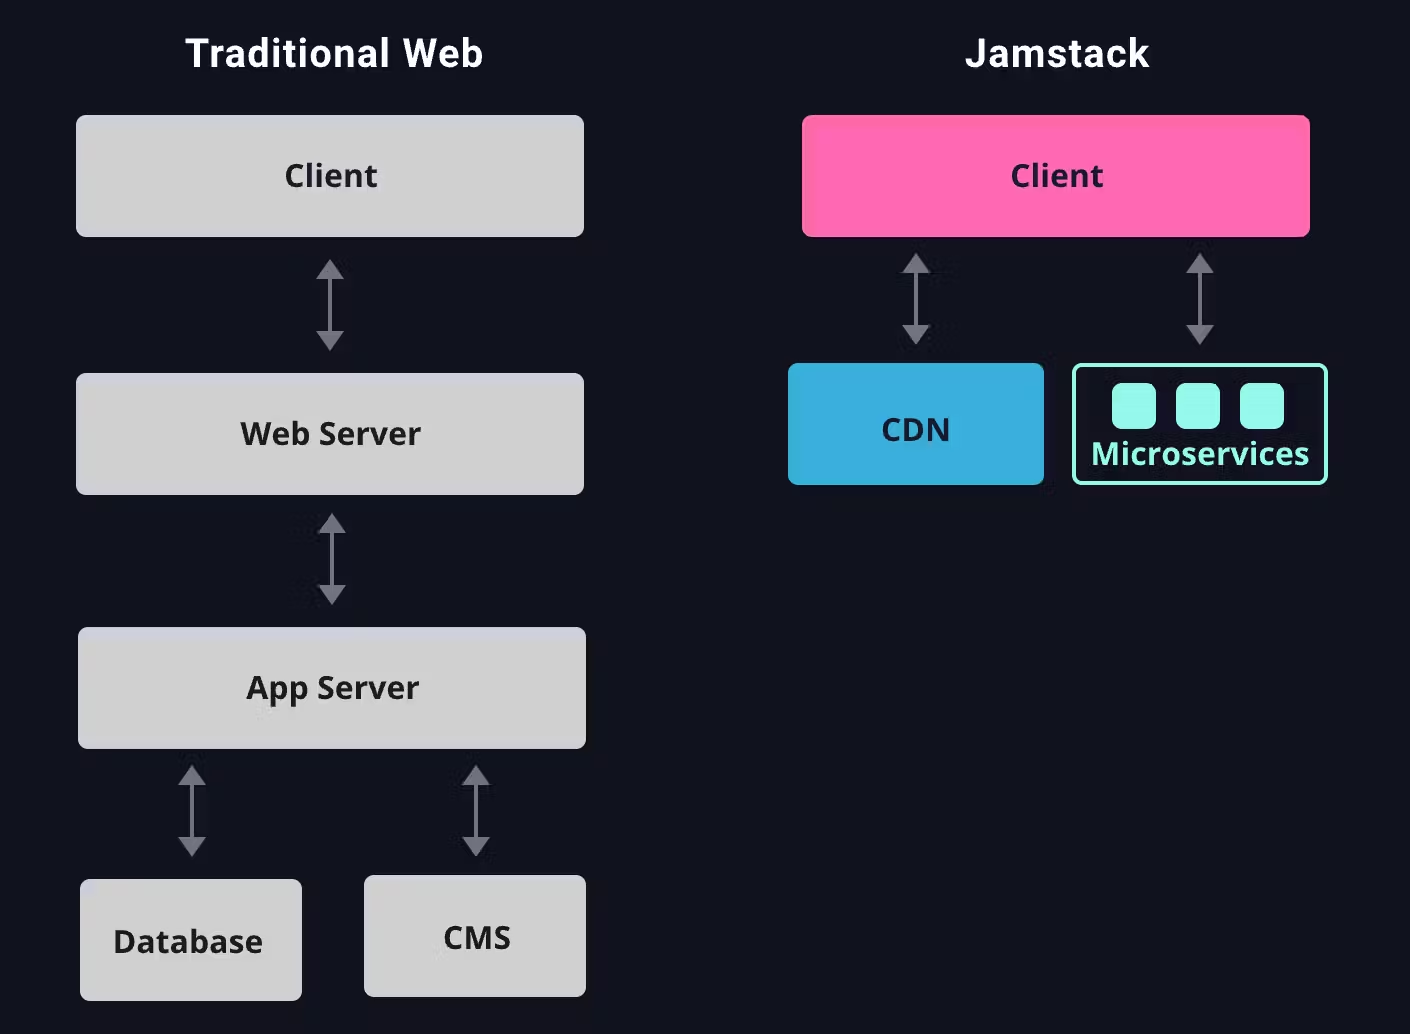
The better performance really comes down to Static Site Generation. By using a Jamstack architecture we allow ourselves to statically generate the content for our website at build time. That pre-generated content can be beamed directly to our users.
In traditional web development, we generate the page with each request. If our page is going to be the same for every user, why not generate it once and send that static content out to our users. That's how we get the big jump in performance with Jamstack.
Higher Security
I cannot tell you Jamstack solves ALL security issues. But it does a good job of simplifying security with the API layer in Jamstack. In the Jamstack architecture, we are using API's to gather data and pull in content during build time. This means secret keys, authentication, and accounts can all live on the build server and don't need to be exposed to the client at all.
Another benefit is fewer network calls. We make the call once on our build server and we have everything we need. We do not push that responsibility down to the client.
Jamstack doesn't remove all security risks, but the API driven architecture can bring on more simplicity.
Scalability
Remember those static assets I've mentioned so many times now? Well, because those assets are stored directly on a CDN without a server involved scaling up is incredibly easy. Spread your assets on a world-wide network of CDN's and you are set. No upgrading beefy servers to handle more requests, the CDN's have you covered.
So handling a few requests to a thousand requests isn't difficult for a Jamstack architected site.
With no more servers to deal with, having all our content statically generated, and using API's to populate our content we get to see those benefits of performance, security, and scalability.
Managing multiple mailboxes using Gmail
In this tutorial I am going to show you how you can add and access your Webmail Emails also send emails using Gmail.
For eg, Hostinger Email Mailboxes powered by Roundcube Webmails, which looks something like this :
This guide follows Hostinger Email Mailboxes powered by Roundcube Webmails, which looks something like this :

But sometimes, people won't be able to follow the new interface everytime, They would be like - I don't like the interface, or i don't want to use it Gmail is better !
In that case ! worry not 🙂
Adding the webmail email to your Gmail Account
Follow the below steps to connect your Mailboxes in your Gmail account.
1. Get the configuration settings (Prerequisites):
For starting before setup, you will need your email access and configuration setting. For eg, I have logged in to Hostinger and my email has a configuration setting, which looks something like this :

2. Login to your Gmail Account, where you want to add the mailboxes :
Click your settings gear

Click Accounts and Import Tab
Find the section : Check email from other accounts:

3. Click on Add an Email Account
Enter your email address you want to connect, for eg. In my case I want to manage mail@sujaykundu.com from my other Gmail account. And Hit Next

4. Type the POP configuration of your Email Provider, As I am using hostinger :
You need to add the following details :
Username : mail@sujaykundu.com (Your email address that you want to add)
Password : your email password goes here
POP Server : pop.hostinger.com (for Hostinger)
Port : 995
Enter the email details correctly and click Add Account

5. Setup SMTP Configuration (to send Emails)
In the next screen it will ask to add the Sending Email Configuration (SMTP Server configuration) – this is for when you want to send emails from GMAIL using the email you want to add. For Hostinger :
This is the configuration :
SMTP Server : smtp.hostinger.com
Username : mail@sujaykundu.com (Add your email address here)
Password : Your Email Password
Secured Connection : Using SSL (recommended)

Done, You should be able to manage your emails from here !
5. Confirm Action
Google will send a verification code to your email account, add that and you are good to go !!


Once added, you can now see a new mailbox added under labels section in your Gmail account Sidebar.
Whenever you will get a new email, it will sync with it also you can send emails with the new setup using both the Email Ids .
The emails can be differentiated via the labels :


- Test your Email Send an Email from your connected account to any gmail account you own, just to test.
It's important that you test your emails properly by sending an email to another account.
If it works, you will receive a new email. You can add multiple mailboxes in Gmail like this.

Well, I received the email in my other email 🙂 ! It works
Send it back, to check where it lands !!
It should land in both your webmail and Gmail, as Gmail should be able to sync it.

As You can see, I received both the emails both in mailbox and in our newly connected account in Gmail.

There is a Gmailify feature available for Outlook and other services. Do check it out too Gmailify best of gmail without gmail
That's it. Have Fun Gmailing.