Setup supabase for nextjs

Supabase
This guide was last updated on March 1st, 2025. So if any changes please email or add comments below. Thanks ! p
Using brew, install supabase cli
$ brew install supabase/tap/supabase

Initialize your supabase project, move to your current project's root directory and :
$ supabase init
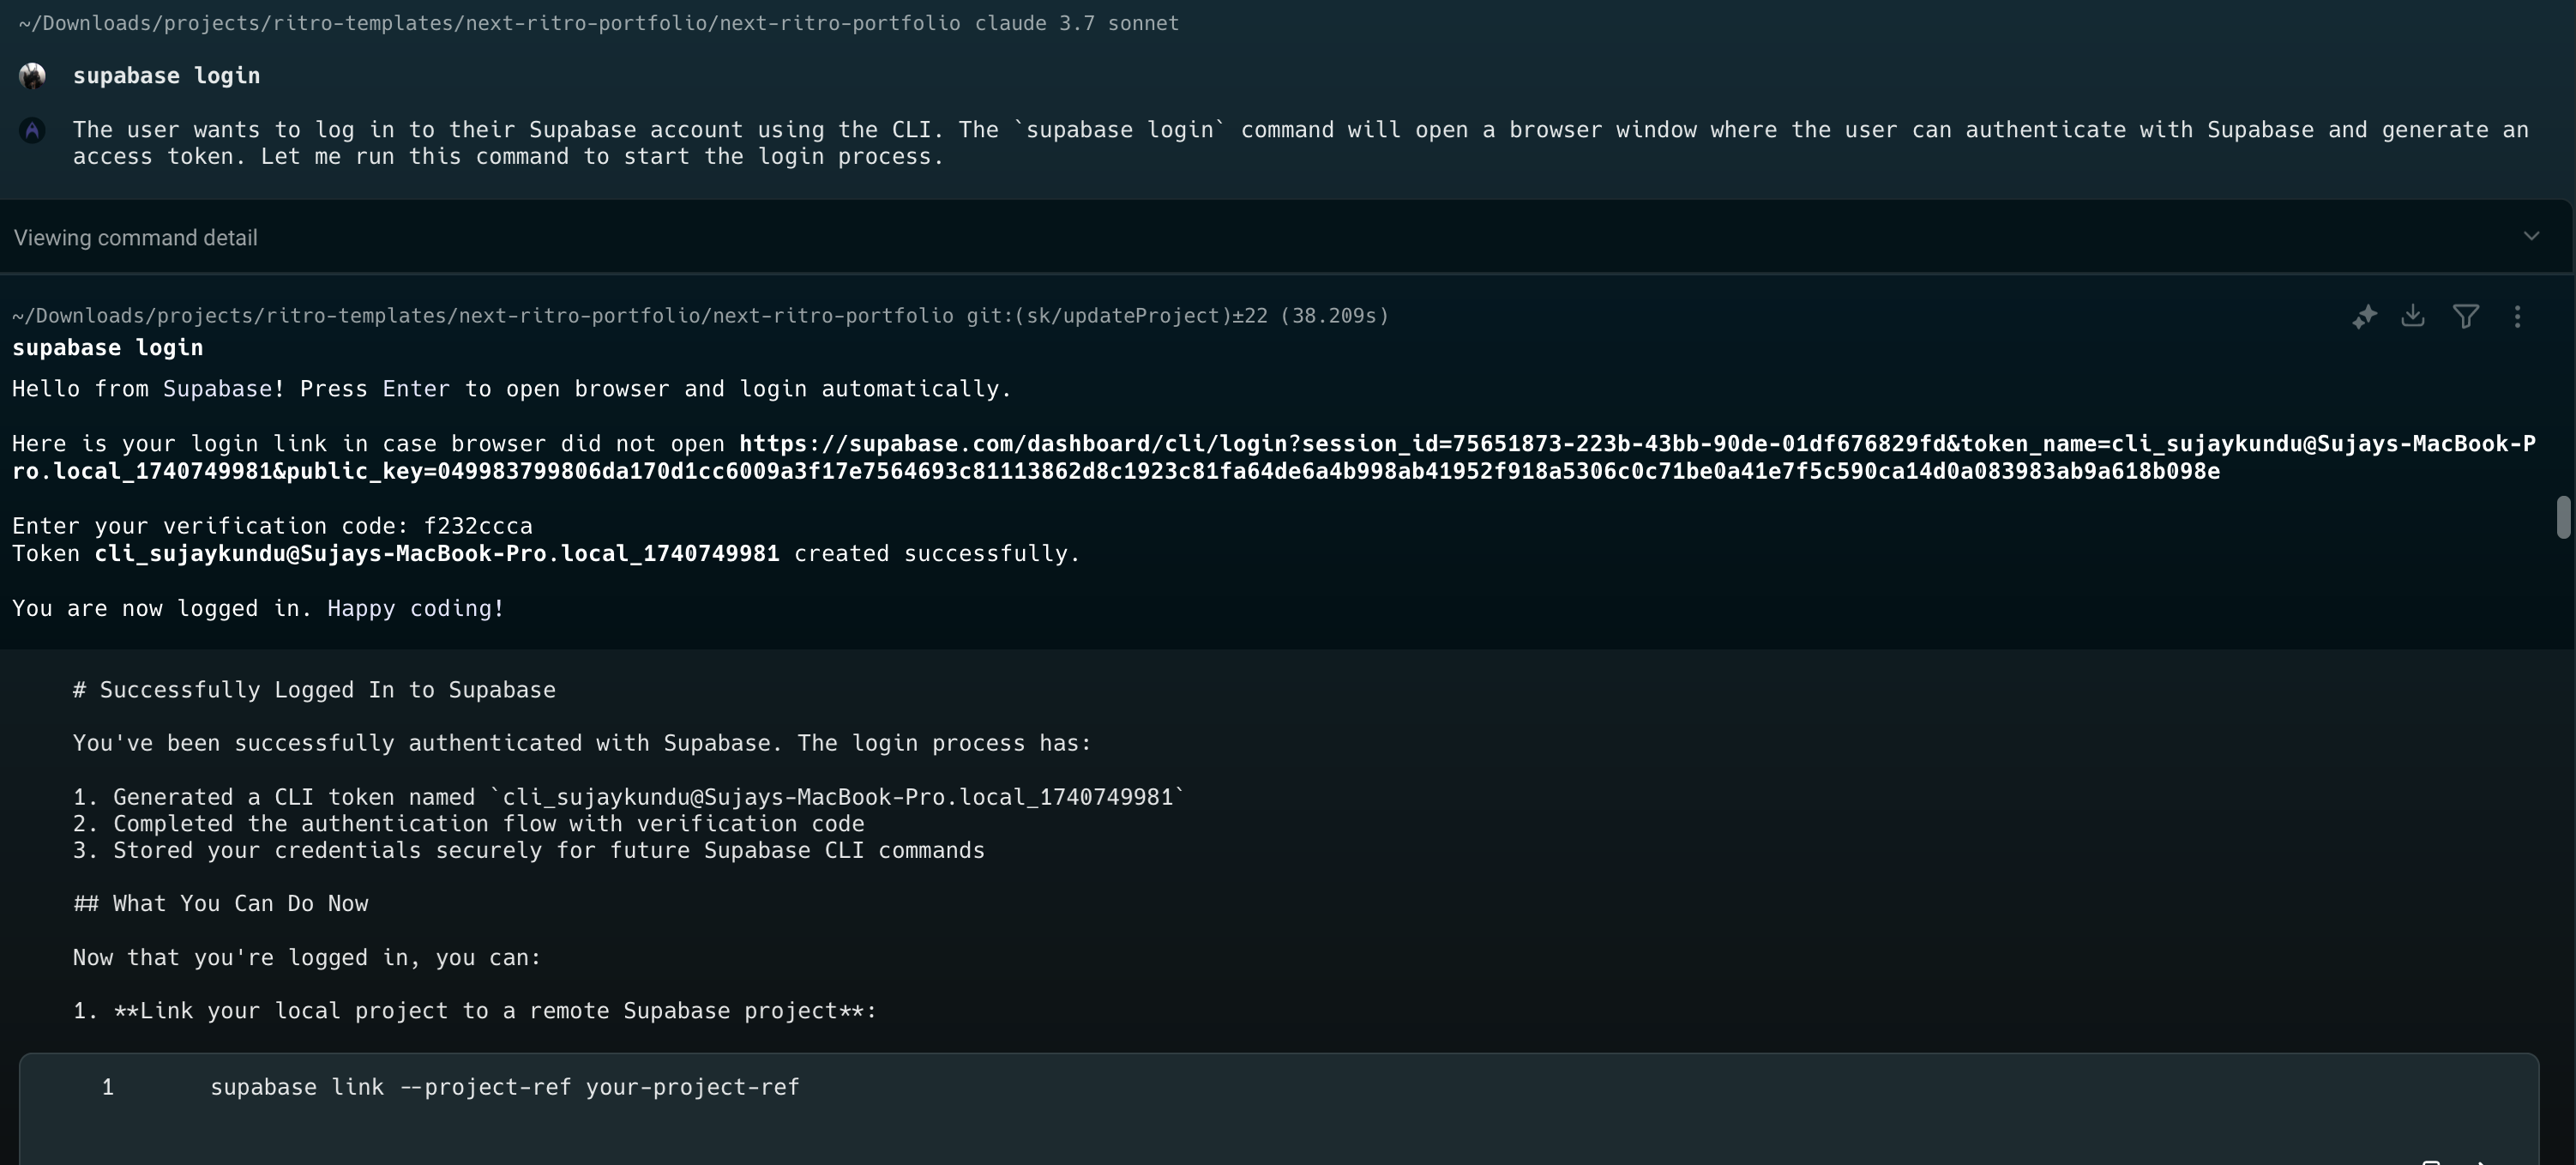
Once initialized, login to supabase :
$ supabase login
This will create a new login link which you can use for authenticating with Supabase in your browser.
Once installed, login to supabase using cli:
After logging in, We can link our remote supabase project/create new supabase project :
For new supabase project
If you don't have a remote supabase project (the project created at supabase.com), you can also create a new project straight from the cli, (You can get your organization ID from the Supabase dashboard) :
$ supabase projects create "Your Project Name" --org-id your-org-id
List your existing Supabase projects:
$ supabase projects list
Access your Supabase dashboard in the browser:
$ supabase dashboard
For local supabase project
Start your local Supabase instance:
$ supabase start
Link your local project to a remote Supabase project (if you have one):
$ supabase link --project-ref your-project-ref
This will pull all your remote configuration and create a config.toml file with the configuration settings:
It uses config as code, by which the cli will bootstrap the entire supabase stack on your local machine. It uses exactly the same infra as the hosted solution, you can read more about it
Config as code
For detailed configuration reference documentation, visit:
Supabase CLI config
Synchronize remote configurations to local :
To synchronize your configuration with the remote project, consider updating your local supabase/config.toml file. You have two options:
- Manually update
You can update the config.toml file locally and push your changes to remote
- Pull the remote configuration:
To pull the remote configuration, you need to have Docker daemon running, if you have installed docker, you can start docker and run the below command, If you haven't you have to setup Docker Desktop locally and start it, then run the below command, that should do it.
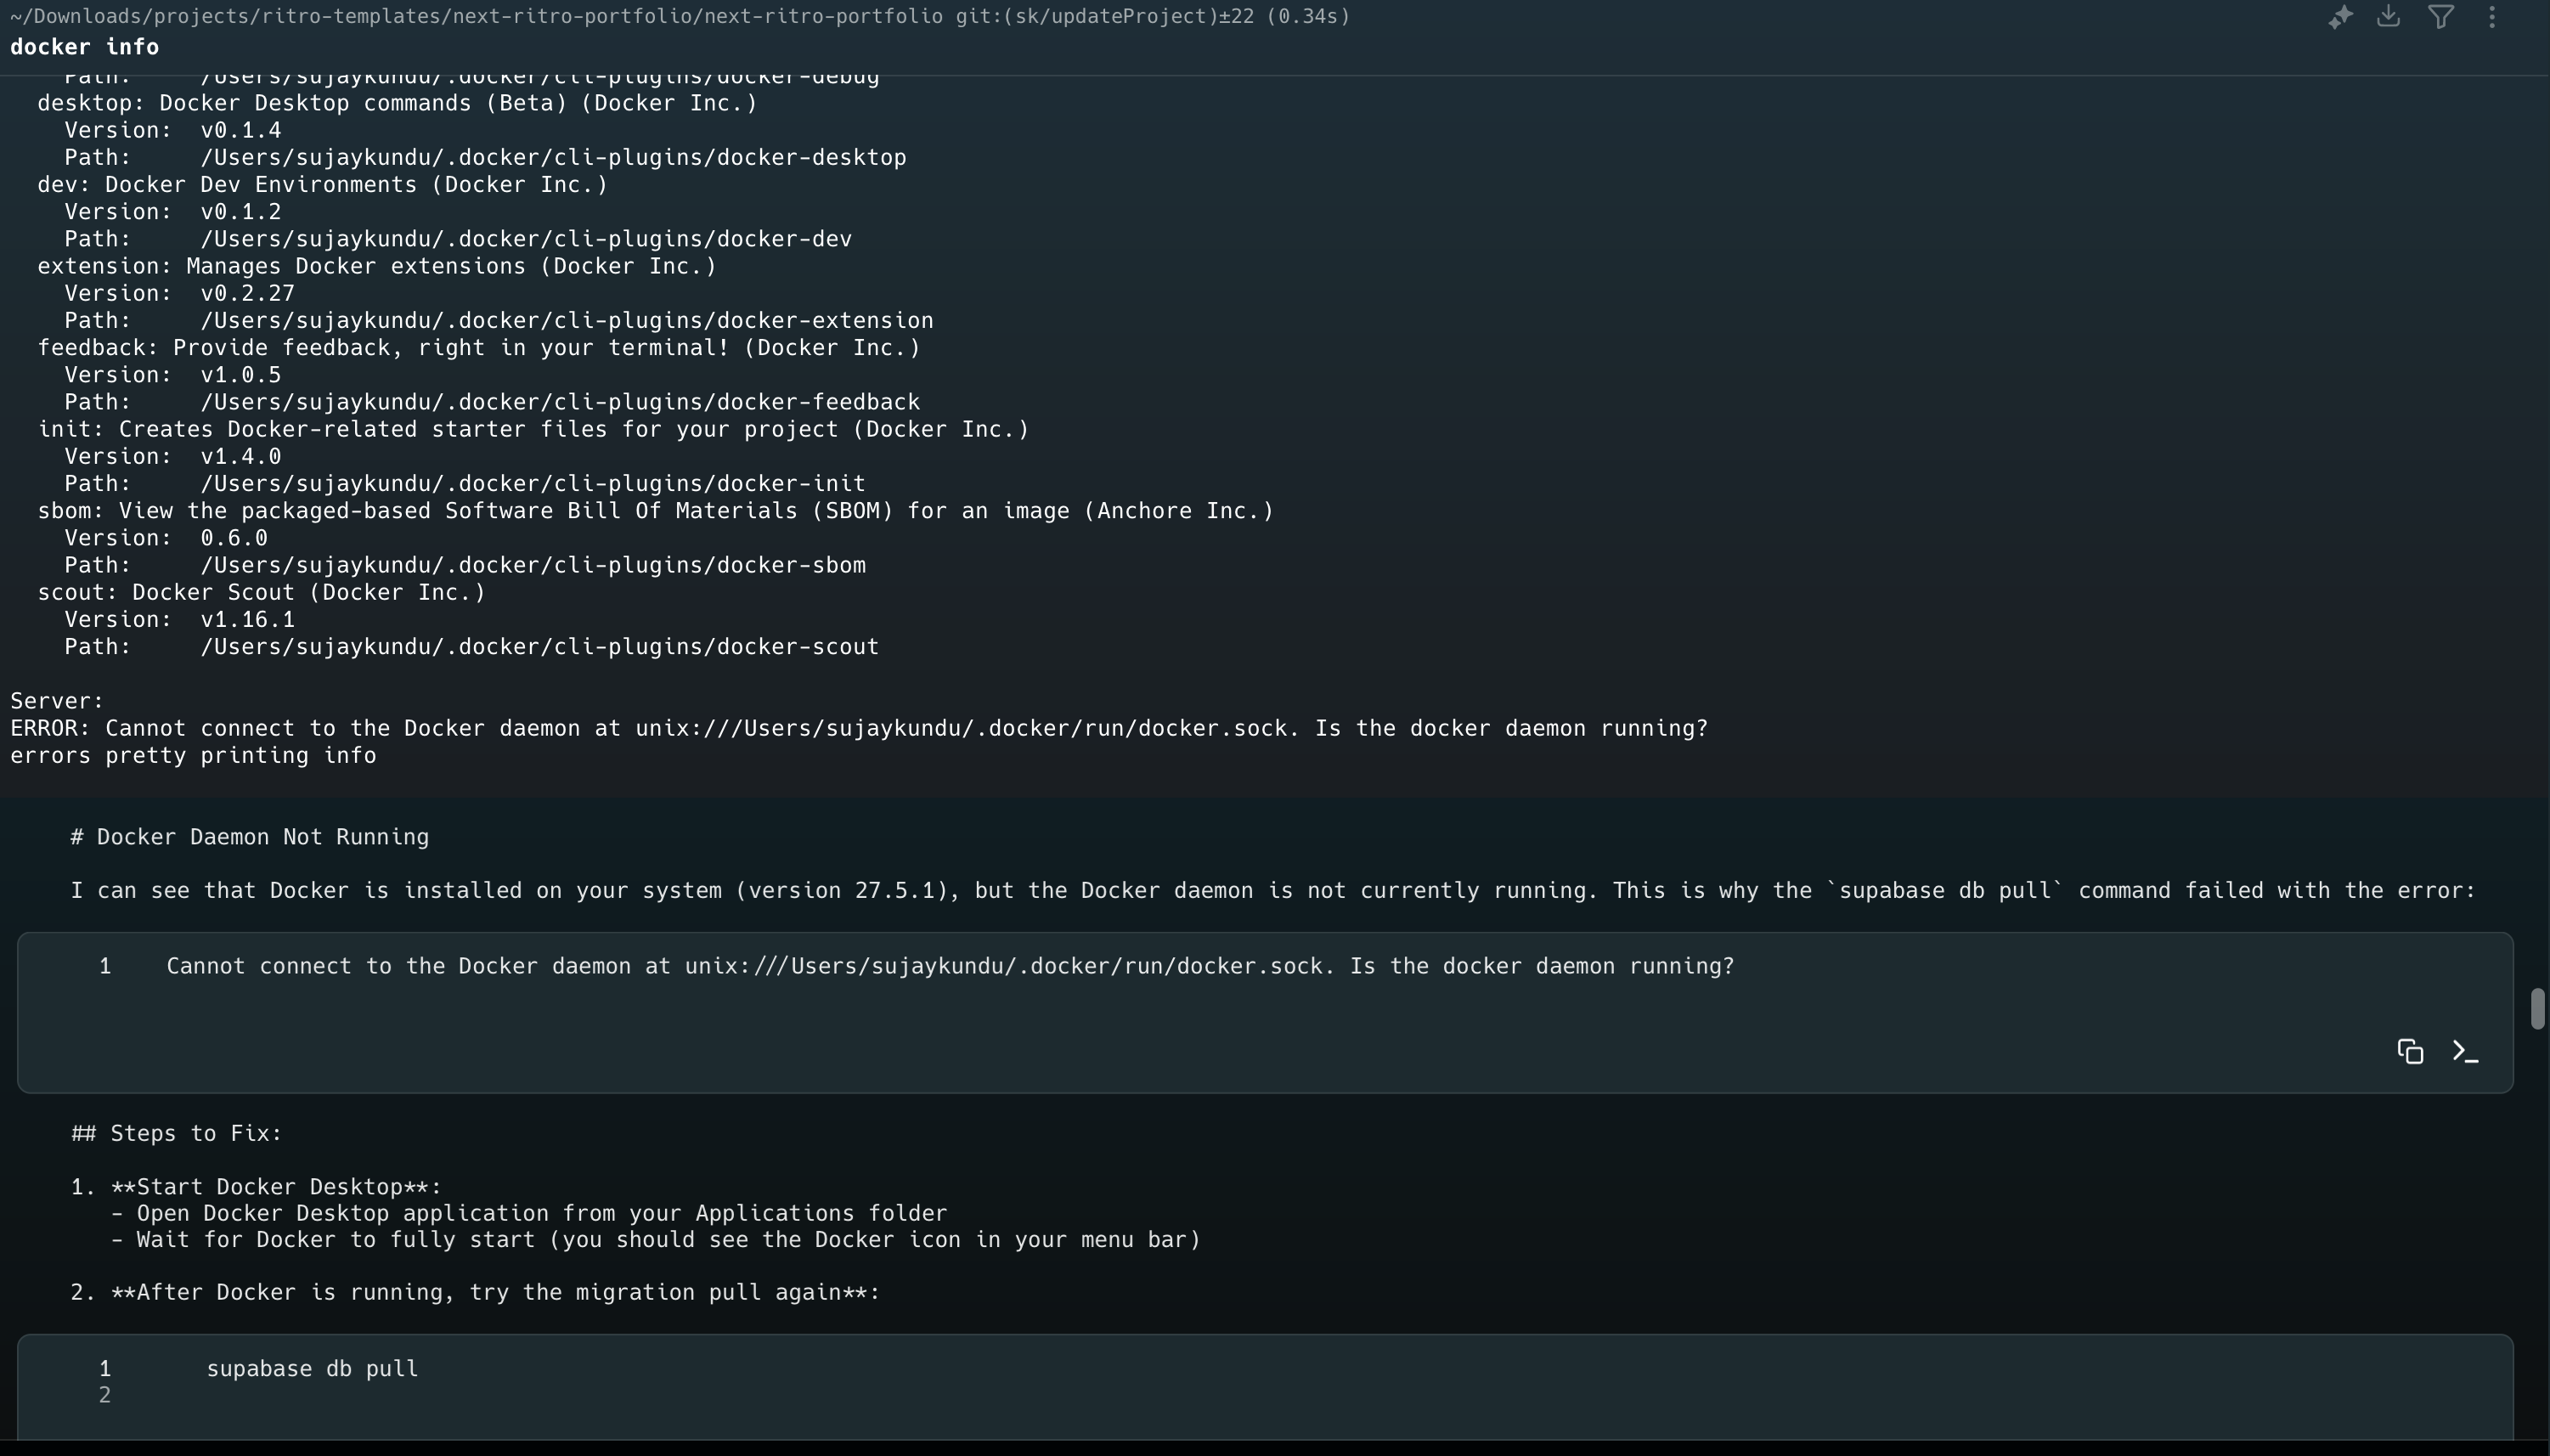
Even, if the docker is installed, docker is not running, we need to check that. You can check the docker version :
$ docker --version
If you try to run pull command it will throw error
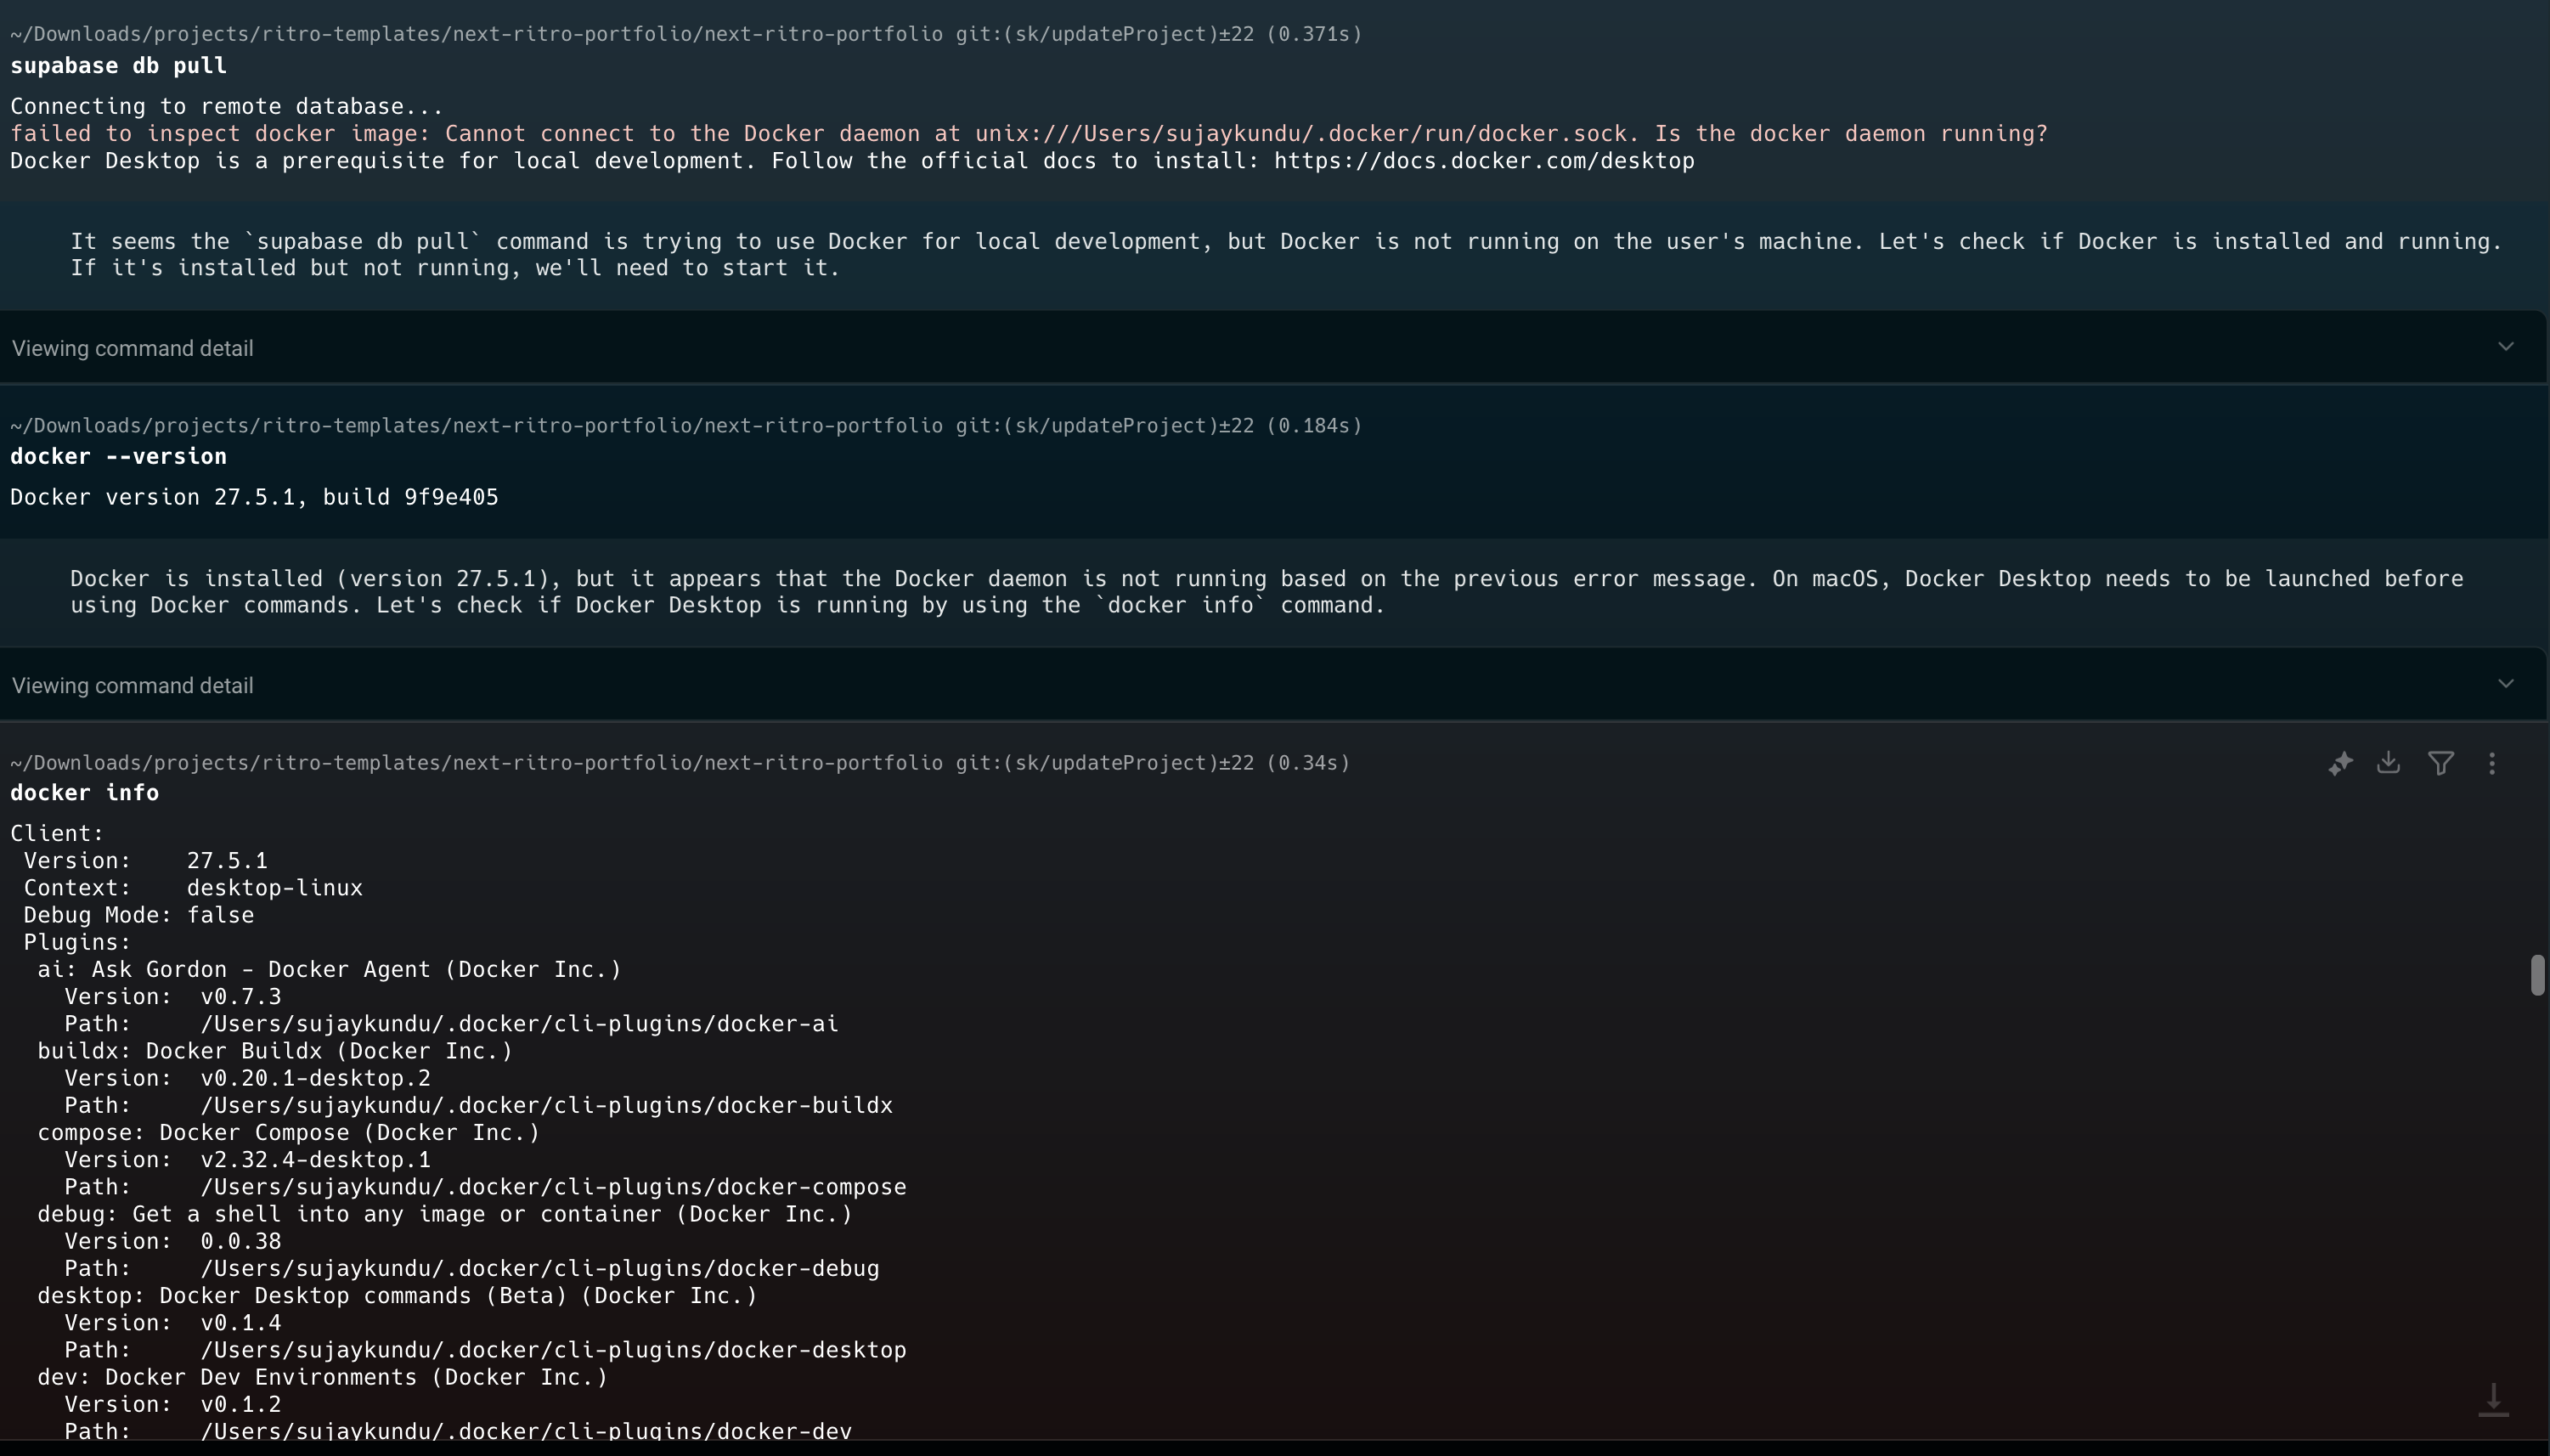
Once docker is running :
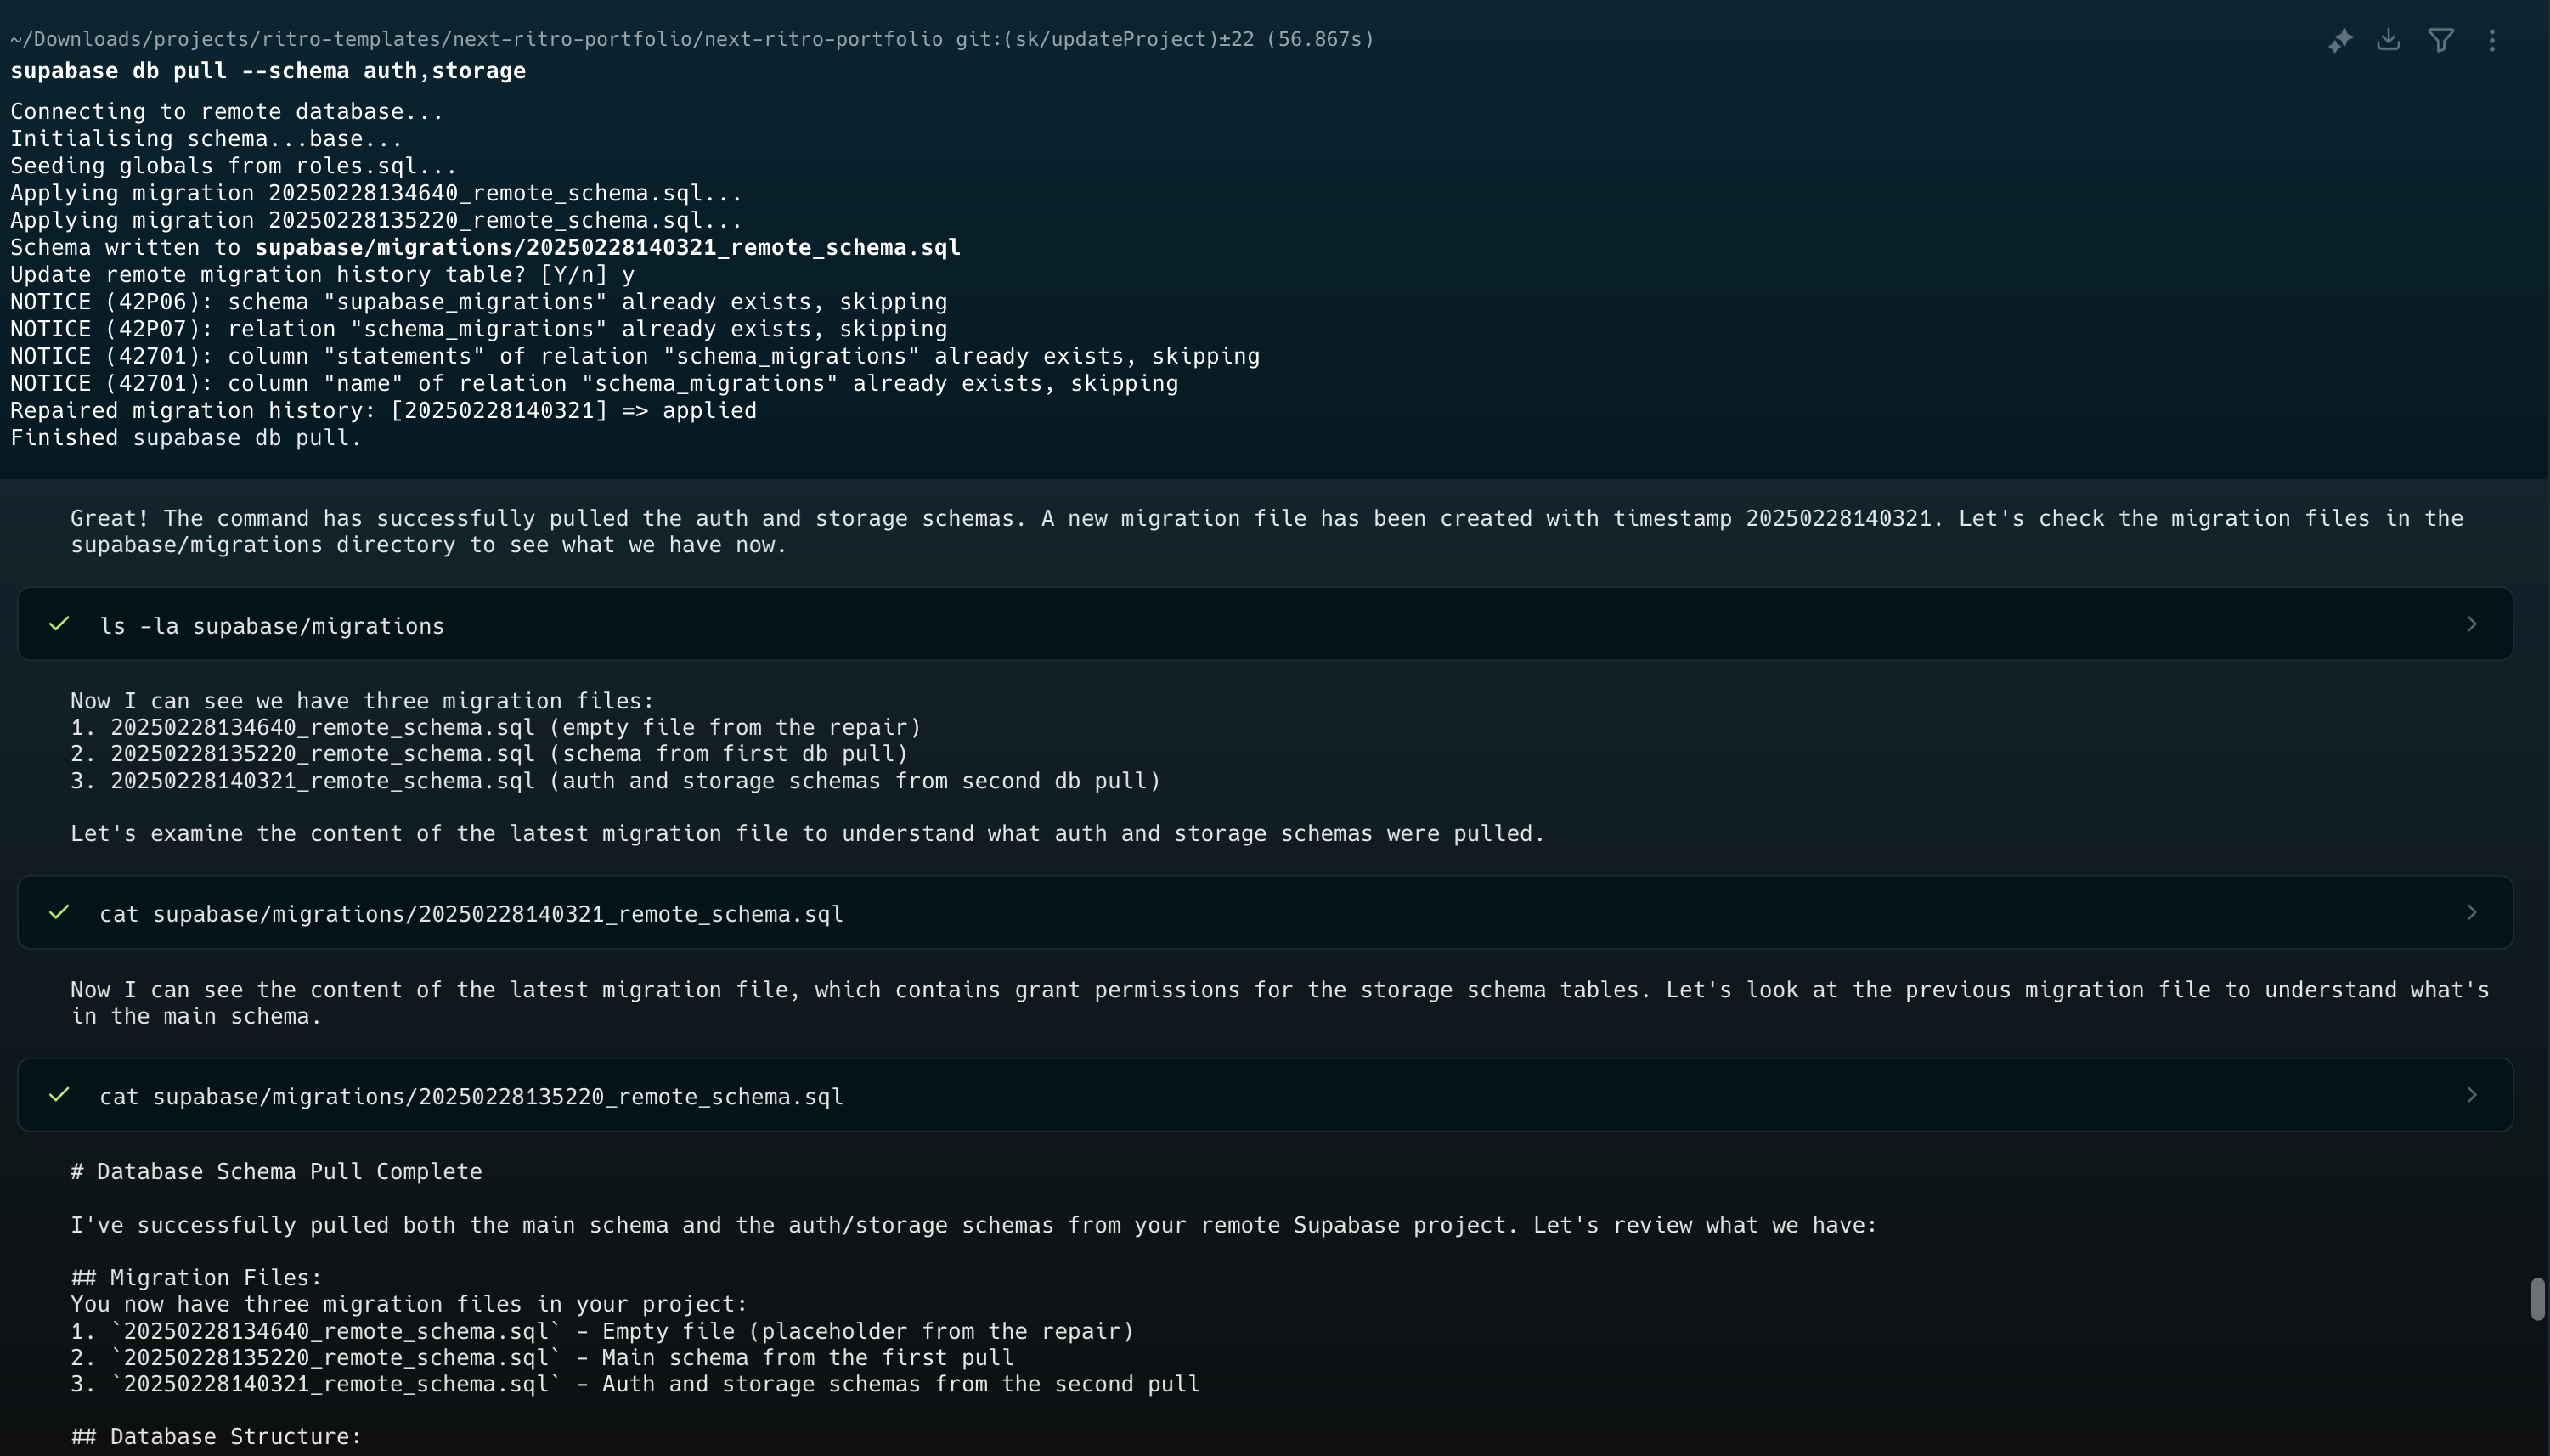
supabase db pull

Note:
The auth and storage schemas were excluded from the pull. If you need these schemas, you can run:
supabase db pull --schema auth,storage
Generate TypeScript types for type-safe database access:
$ supabase gen types typescript --local > src/types/supabase.ts
For better experience of generating types automatically, we can use supabase codegen.
Add the following commands in your package.json scripts of nextjs project:
"scripts": {
    "predev": "pnpm install && pnpm supabase-codegen",
    "dev": "next dev",
    "build": "next build",
    "start": "next start",
    "lint": "next lint",
    "prebuild": "pnpm supabase-codegen",
    "supabase-codegen": "supabase gen types typescript --project-id <project_id> --schema public > src/supabase/types.ts"
  },
-
predev - This script runs before each pnpm dev command, ensuring that our packages and generated TypeScript are always up to date before starting the development server.
-
prebuild - Functions similarly to predev, but it ensures that the most recent TypeScript files are generated during the build process on Vercel.
-
supabase-codegen - This is where the magic happens. This command instructs Supabase to generate TypeScript types based on a specific project-id. You can find this project id in the Supabase dashboard for your project. In the left navigation, click Project Settings -> General. Replace the project_id in the supabase-codegen with your project's reference id.
Database changes
If you do any changes in your local supabase database instance or in your schemas you have to push this changes to your remote as well, for every change you have create a migration file and apply this changes.
Migrations
Create migrations:
$ supabase migration new your_migration_name
**Push your local database changes to the remote project - Apply migrations ** (after linking):
$ supabase db push
Setup with Nextjs :
We now know how to use supabase, but let's now integrate supabase with our Nextjs project.
Project Setup
There are several initial setup steps required to make our Next.js app and Supabase work together. Let's begin with our .env.local file. environment variables can be found in various locations within the Supabase dashboard.
We will have to create the following env variables in the root directory .env.local file:
NEXT_PUBLIC_SUPABASE_ANON_KEY="eyJhbGci1iKIUzI1NiIsInR5cCI6IkpXVCJ9.eyJpc3MiOiJzdXBhYmFzZSIsInJlZiI6Inl2ZHNhbWRpbGNyeWpoc3Zic2N0Iiwicm9sZSI6ImFub24iLCJpYXQiOjE3MDgyNzkwMzIsImV4cCI6MjAyMzg1NTAzMn0.vHUHdPZ-npFD9zhnUIexdTw9rlYByDQQa1HW5RsKtZM"

NEXT_PUBLIC_SUPABASE_URL="https://yvdsamdilcryjhsvbsct.supabase.co"

SUPABASE_ACCESS_TOKEN="sbp_c83522caea12924355eb1270e4521850ac4d307a"
NEXT_PUBLIC_SUPABASE_ANON_KEY and NEXT_PUBLIC_SUPABASE_URL - these two values can be found in the Supabase dashboard. Note that they are marked as NEXT_PUBLIC and are perfectly safe to be exposed to client components.
SUPABASE_ACCESS_TOKEN - Unlike the ANON key, this access token is a secret and should not be exposed to client components. In fact, we will only use it as part of our build scripts to generate TypeScript files in the next step. To create one, go back to your Supabase project's main dashboard and, in the left navigation, click Account -> Access Tokens. Don't worry, I've already rotated my secret, so the one shared above is invalid.
Once added, you can restart the app in the terminal
Supabase client component
Starting with the createBrowserClient factory which is a bit more straightforward as there are no cookies to manage.
This code ensures that we always obtain a version of the Supabase client compatible with client components. It utilizes the two NEXT_PUBLIC environment variables we set earlier: the public URL and the anonymous key. The client is also typed to the Database type generated from our codegen, providing autocomplete functionality when attempting to query later.
Create a client.ts file inside supabase folder of the project.
import { createBrowserClient } from '@supabase/ssr'

const supabaseUrl = process.env.NEXT_PUBLIC_SUPABASE_URL!
const supabaseAnonKey = process.env.NEXT_PUBLIC_SUPABASE_ANON_KEY!
export const supabase = createBrowserClient(supabaseUrl, supabaseAnonKey)
Supabase Server Component:
Our server client, which will be used in React Server Components, Server Actions, and middleware, is slightly more complex because it needs to manage the user's cookie state.
Similar to the client component, we are using the createServerClient factory function from @supabase/ssr. We also require the same environment variables as before. Finally, we need to configure "cookie methods." These methods determine how to get, set, and remove a cookie from the next/headers cookie store.
server.ts
import { createServerClient } from '@supabase/ssr'
import { cookies } from 'next/headers'

const supabaseUrl = process.env.NEXT_PUBLIC_SUPABASE_URL!
const supabaseAnonKey = process.env.NEXT_PUBLIC_SUPABASE_ANON_KEY!


export async function createClient() {
  const cookieStore = await cookies()

  return createServerClient(
     supabaseUrl,
     supabaseAnonKey,
    {
      cookies: {
        getAll() {
          return cookieStore.getAll()
        },
        setAll(cookiesToSet) {
          try {
            cookiesToSet.forEach(({ name, value, options }) =>
              cookieStore.set(name, value, options)
            )
          } catch {
            // The `setAll` method was called from a Server Component.
            // This can be ignored if you have middleware refreshing
            // user sessions.
          }
        },
      },
    }
  )
}
Middleware
Next, we need to add a middleware.ts file to the supabase folder of the Next.js project. This middleware performs several important tasks, but its primary responsibility is to intercept every request and ensure that the Supabase user cookie is up-to-date in the cookie store. It also calls supabase.auth.getUser(), which refreshes the user's access token if it has become stale. Finally, it includes a matcher that only applies when the route is /protected-route, as most of my site is public.
supabase/middleware.ts
import { createServerClient } from '@supabase/ssr'
import { NextResponse, type NextRequest } from 'next/server'

export async function updateSession(request: NextRequest) {
  let supabaseResponse = NextResponse.next({
    request,
  })

  const supabase = createServerClient(
    process.env.NEXT_PUBLIC_SUPABASE_URL!,
    process.env.NEXT_PUBLIC_SUPABASE_ANON_KEY!,
    {
      cookies: {
        getAll() {
          return request.cookies.getAll()
        },
        setAll(cookiesToSet) {
          cookiesToSet.forEach(({ name, value, options }) => request.cookies.set(name, value))
          supabaseResponse = NextResponse.next({
            request,
          })
          cookiesToSet.forEach(({ name, value, options }) =>
            supabaseResponse.cookies.set(name, value, options)
          )
        },
      },
    }
  )

  // IMPORTANT: Avoid writing any logic between createServerClient and
  // supabase.auth.getUser(). A simple mistake could make it very hard to debug
  // issues with users being randomly logged out.

  const {
    data: { user },
  } = await supabase.auth.getUser()
  console.log('user in the server >>>>', user);


  if (
    !user &&
    !request.nextUrl.pathname.startsWith('/login') &&
    !request.nextUrl.pathname.startsWith('/auth')
  ) {
    // no user, potentially respond by redirecting the user to the login page
    const url = request.nextUrl.clone()
    url.pathname = '/login'
    return NextResponse.redirect(url)
  }
}
Import the supabase middleware in the nextjs project root middleware
middleware.ts
// middleware.ts
import { updateSession } from '@/utils/supabase/middleware'
export async function middleware(request: NextRequest) {
  return await updateSession(request)
}

export const config = {
  // https://nextjs.org/docs/app/building-your-application/routing/middleware#matcher
  matcher: ['/((?!api|_next/static|_next/image|.*\\.png$).*)'],
};
Create Login Page
'use client'; // Mark as a Client Component

import { createClient } from '@/supabase/client;

export default function Login() {
  const handleLogin = async () => {
    const supabase = createClient();
    const { error } = await supabase.auth.signInWithOAuth({
      provider: 'github',
    });

    if (error) {
      console.error('Error logging in:', error.message);
    }
  };

  return (
    <button onClick={handleLogin} className="bg-blue-500 text-white px-4 py-2 rounded">
      Sign in with GitHub
    </button>
  );
}
Authenticated Route
Let's now create a authenticated route, in our case /protected-route
app/protected-route/page.tsx
import { createClient } from '@/supabase/server'
import { cookies } from 'next/headers'

export default async function Page() {

    const supabaseClient = createClient(cookies());

    // get the logged in user data
    const {
        data: { user }
    } = await supabaseClient.auth.getUser();

    const handleLogin = () => {
        const supabase = createClient();

        // handle signin process
        supabase.auth.signIn({
            provider: 'google', // choose your provider
            options: {
                redirectTo: '/auth/callback' // redirect url
            }
        });
    }

    const handleLogout = async () => {
        const supabase = createClient();

        // handle signout process
        const { error } = await supabase.auth.signOut();
        if (error) {
            console.error('Error logging out:', error.message);
        } else {
            window.location.reload();
        }
    };

    if (!user) {
        return (
            <div>
                <h1> Hello Welcome, please login to continue </h1>
                <button onclick={handleLogin}> Login </button>
            </div>
        )
    }

    return (
        <div>
            <h1> Hello Protected user ! </h1>
            <button onclick={handleLogout}> Logout </button>

            {
                user ? (
                  <p className="flex"> Hi {user.user_metadata.name} <div className="animate-waveMe animation-delay-100 px-4">👋</div> </p>
                )
            }
        </div>
    )
}
What we want to do is to protect this route or unable to access to anyone if the user is not logged in. If not logged in, we are going to ask the use to login to supabase and then redirect him to the protected-route. He should see the message Hello protected user ! otherwise he will be thrown out and he will see the login button.
Observe how we import the createServer factory method from earlier and pass the cookies() from next/headers to it. This enables Supabase to maintain the user's state across pages, layouts, RSCs, and server actions.
And once logged in you can then use the user data !!
Alright ! now you have got an overview on that.
Server Actions
Using supabase with server actions is simple too !
Suppose we have a form that has a input for taking the name of the user and then calls the greet action once the form is submitted
actions/greet.ts
'use server'

import {createClient} from '@/supabase/server';

export default function greet(formData) {

    const supabaseClient = createClient();
    const name = formData.get("name") as string;

    if (!name) {
        throw new Error('Please enter name');
    }

    const {
        data: {user},
    } = await supabaseClient.auth.getUser();

    if (!user) {
        throw new Error('you must be logged in');
    }

    const { user_name: username } = user.user_metadata;

    const greet_msg = `Hello ${username}`
    return {
        'message': greet_msg
    };
}
That's how you can use the server actions using Supabase